Wednesday, February 13, 2013

A Card Out Of Paper

 
Mariposa card.
 
Close up of card.
 

Lately I have been embroidering cards but thought it would be fun to use paper.  The card is made from two pages out of the Mariposa pack.  First I cut out the sonnet square and used it as the background, leaving the butterfly at the bottom and cutting around it.  Next I cut out the larger butterfly and the little butterfly square.  I arranged them on the card and then added a second small butterfly using the second identical page, and gluing it on top to give dimension.  Because I left the small butterfly extended, the card would not fit in a standard envelope.  The envelope I made didn't come out square and didn't even over lap in the center so I cut out a butter fly and covered the hole stabilizing the envelope.  I hope it is liked!

 
Envelope.
 

Tuesday, February 12, 2013

Patterns of Fashion 3

This year I have been greedily buying books and have been enjoying them a great deal!  As part of my Christmas I bought "Patterns of Fashion 3" and 4 by Janet Arnold.  A review of the books said that the patterns were complex and not for the inexperienced sewer.  They were right!  Both books are quite interesting and contain many patterns which are from original pieces.  The patterns are 1/8 inch to 1 inch so they fit into the books.  So I got the idea of enlarging them slightly so that they would fit on a Barbie.  The first try came out short but I've a better idea now of how to alter the patterns to fit the strange Barbie figure.  The funny thing is that the skirt I tried looks like the burgundy skirt I was making.  Well back to sewing a bodice.  If this works I may try and make one for myself!

Monday, February 11, 2013

Valentine Inspired Velvet Ribbon Flower

 
Velvet ribbon flower.

Recently I have purchased a lot of new books on ribbonwork and making ribbon flowers.  The book I was looking at today is "A Passion for Ribbonry".  With more than 20 books on ribbonwork and ribbon embroidery the book repeats a lot of ideas in other books.  That is good because the book needs to show the basics.  This book inspired me today to try a technique that I had seen before but thought it made rather dull flowers.  The zinnia on page 69 of this book was so lovely, it was made sewing the ribbon in a zigzag pattern using a sheer ribbon with dense edges. 

 
Zigzagged ribbon.

The design calls for 1 1/2 yards of 1 inch wide organza ribbon, stamens and a square of buckram.  I didn't have buckram so I used crinoline.  I didn't have 1 inch organza ribbon so I used 3/8 inch ribbon.  The pattern called for marking the ribbon edges every 2 inches alternating the marks from side to side.  The 3/8 inch ribbon was rather small for the technique and I had to stop to rest my hands and eyes.  So I took some red velvet ribbon and started to make a flower that was easier to see.  The ribbon was 1 1/2 inches wide and I used close to 1 1/2 yards to make the flower.  I zigzagged from one side to the other and pulled the thread as I went.

 
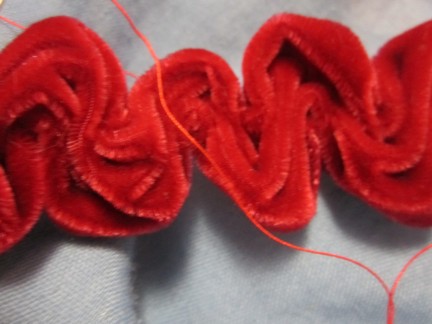
Zigzagged ribbon pulled tight.
 
 
Close-up of velvet ribbon.
 
After pulling the ribbon I loosely spiraled it to get an idea when I had enough zigzagged.  Once I had enough ribbon done I pulled it tight and finished it off by knotting it three times so it could not pull out.  Then I cut the ribbon off the remainder.  Using the the thread I formed the first four pedals into the flower center and sewing them in a circle to the crinoline.  The ribbon has both an upper and lower petal alternating.  I sewed through the lower petal ends attaching them to the crinoline.  This causes the petals to stand up straight.
 
 
Forming center of flower.
 
 
Sewing through the petals to form the flower.
 
 
Close-up of flower center.
 
Next I spiraled the petals around the center and sewed through the bottom petals and crinoline allowing the upper petals to point outward a bit.  When I got to the end of the petals I sewed the cut end under the last upper petal.  Finally I cut the excess crinoline off so that it didn't show.  Be careful not to cut the sewing threads while doing this.


Finished velvet flower.

A Valentine Gift

After several days of reading I finally felt inspired to make a Valentines gift.  It took a few hours but that was mostly because I sewed a gift pouch by hand.  It was good practise and my stitches are getting more even.

First I took a rose quartz chip necklace I had made and added a drop to give it more interest.  Using two bicones a small crystal butterfly and a zircon pendant I wired them into a drop.  It shows how even inexpensive chips can be made to look fancy.

 
Rose quartz necklace.

Then the present needed a pouch so I cut 2 8 inch squares from two different fabrics.  The outside fabric was a Valentine cotton print and the inside damask satin.  They were sewn right sides together using a 1/2 inch seam.  Then leaving an opening the square was turn right side out.  Using tiny stitches the opening was closed.  Then with the outside square up the corners were turned down about 1 1/2 inches.  This should have been a smaller turn down because the finished pouch does not close completely.

 
Turned down corners.
 
Next the corners are sewn down at the top about 1/4 inch.  This creates a tunnel to run cording or ribbon through to close the pouch.
 
 
Sewing down the pouch corner.
 
Finally some white ribbon was run through the four sides and pulled to close.  By using two different fabrics it now looks like a flower.
 
 
Top of pouch.
 
 
Bottom of pouch.
 
Hopefully the person receiving it will like it!

Wednesday, February 6, 2013

Cutting Out Petals for Herb Robert

Today was not a very productive day.  However I did finish the 10 flower petals and cut them out.  There were some threads showing from the background muslin so I touched them up with a marker.  Still have 7 petals to embroider and I want to be finished by Saturday so I have to really get moving!  Tonight I am going to try and make a stumpwork ladybird.  They are so cute.  Last year I went looking for a copy of a book called "les grandes heures d'anne de bretagne".  I couldn't find a copy anywhere so after waiting a year I tried again and the google search found wonderful pictures online now!  The Herb Robert project is based on the book.  Can't wait to try and make my own designs!  Well, back to work.

Tuesday, February 5, 2013

Herb Robert Revisited or Stumpwork Embroidery Again!

Last February I started working on an embroidery from a Jane Nicholas book.  The pattern was for a flower called Herb Robert.  Finally it is slowly getting finished.  The biggest issue I had was the fuzziness and thickness of the floss.  Even using one strand of DMC it did not give the crispness and fine detail that I wanted.  So I decided to change to silk sewing thread and I am very happy with the results.  I was so amazed when the sewing thread matched perfectly with the flower colors I chose for the embroidery!  So today I worked on the stumpwork petals to finish the flowers.  They had already been worked in floss as outlines over a wire, just had to fill them in!  The seed pods were changed from the original design.  Here they were woven over three threads that meet at the seed pod top.  This is going to the Fair this year!  Here are a few pictures.

 
Close-up of stumpwork petals.
 
 
Herb Robert stumpwork embroidery.
 
 
Close-up of Herb Robert showing the seed pods.

Monday, February 4, 2013

Easy Embroidery

After working on the 3D rose yesterday I decided to take a break and make something easy.  In a pile of finished embroideries I found a piece of satin that had an iron-on transfer from the book "Ribbon Embroidery" by J. Marsha Michler.  So I decided to embroider a ready made pattern.  Instead of using ribbons I used regular cotton floss for everything but the roses in the center.  The roses were my favorite, spider roses, made with 7mm pink ribbon.  I was bad and didn't make the back very neat.  There were some large knots from using six strands of floss to make french knot buds.  Then something awful happened!  When I was adjusting the satin in the frame I developed runs in the fabric.  That has never happened before!  So I had to use the fabric carefully to get around the runs.  Here is a picture of the finished embroidery.

 
Finished embroidery.
 
 
Another view of the embroidery.
 
After playing with the piece I came up with two ideas.  First to make a dress for Barbie.
 
 
Barbie wearing the embroidery as a simple dress.
 
This was so pretty but the damage to the fabric couldn't be gotten around.  I am considering embroidering another design but a lot neater this time.  This could count as one of 12 outfits for Barbie I am going to make this year. 
 
The other idea was to make a book cover with a 5 x 5 inch canvas I bought the other day.  So this will be the cover for a Valentine book I was planning.  The embroidery was so long it had to be set on the diagonal and it came out very nice.  The cover was padded first so that the knots and threads on the back wouldn't show as much. Very different from the Valentine collage book last year.
 
 
Finished book cover.

Sunday, February 3, 2013

Project from chapter 11 of "Roses in Silk and Organza Ribbon"

After letting the silk taffeta petals dry overnight, having soaked them in a product called "Stop Fraying", I started embroidering a rose.  The project is from chapter 11 of "Roses in Silk and Organza Ribbon".  I have to admit that I was having trouble understanding the instructions.  But I kept at it and it worked out fairly well.  The petals were a bit stiff from the anti-fray chemicals.  It took some strength to sew the fabric petals down.  The first section was to sew down a couple of layers of petals and roll the edges.  Then a fan like structure is sewn to the middle.   Finally more petals are sewn into the center and rolled and folded up to cover the bottom of the fan.  Here is a picture of the finished rose.
 
 
Embroidered rose.
 
 
Another view.
 
Why I embroidered an off-white rose onto off-white satin I will never understand. It is very difficult to see the rose. First I was going to dye the tips of the petals pale pink. But that could go wrong so easily. So instead I lifted the petals and dyed the satin fabric underneath.
 
 
Rose after using blue fabric dye on satin fabric.
 
Now it is looking better.  As the picture above shows I placed a piece of felt down on the fabric and the satin stitched over it to make a stem.  Then I added a bit of darker blue dye and the project is now drying.  It will take some practice but I have the basics down.  Tomorrow I will wash the pink petals and start another rose.  It should be fun!  When I'm finished I will make them into Valentine gifts.

Saturday, February 2, 2013

Roses in Silk and Organza Ribbon

To start off the new year I got some books and one of them was Di van Niekerk's "Roses in Silk and Organza Ribbon".  All her books are wonderful but this one really stands out.  She uses the technique of cutting out rose petals from silk taffeta ribbon and then using a fray checking product on them.  I've tried something similar but always found the fray check to be hard when it dried.  So I found a product by Aleene's called "Stop Fraying".  So far it seems very flexible.  I took some silk taffeta fabric and treated the piece with the "Stop Fraying".  It turned the fabric translucent but flexible.  It has only dried a short time so by the morning it may have changed.  I also tried cutting petals out of the same silk taffeta and used a DecoArt product called "SoSoft" on them.  The petals were coated on both sides and allowed to dry.  The dye seems to have stopped the petals from fraying.  The product says to wait 48 hours before washing so it will be a couple days before I will know how it works.  With some luck Monday I will be able to make the Roses in chapter 11 on Monday.