Today I got a really great book in the mail. I've been having a wonderful time ordering from www.paperbackswap.com. So much fun getting books and getting rid of books at the same time. It also feels great when the person getting my books love them! I've sent off 15 books this week to be adopted and I've selected some craftbooks for subjects I didn't have books on. Today I got three books. One book is called "Dolls & Toys of Native America". The dolls are interesting and the book has great pictures. I also got "Bargello Magic" by Fischer and Lasker. Lots of great patterns to use as a source book. Last I got The Needlework Garden and below is the review I wrote for it on Amazon and LibraryThing. So now others don't have to buy it blindly. It is currently offered on Amazon $4.39 used.
There was nothing about "The Needlework Garden" out on the Internet. So I took a
chance and bought the book. It is a really lovely book with great flower
designs. The designs are somewhat abstracted but very pretty. Most of the
projects are household linens but the designs could be used anywhere. Projects
include pillows, a bed cover with wildflower applique, vegtable sampler,
sachets, cards, a cathedral window pillow with wildflowers and more. This book
doesn't have step by step pictures like newer books so may not be good for
beginners. The book does have good instructions and pictures. Definately happy
with the purchase and plan on using the flower designs a lot in future projects.
Definitely found a new book to treasure!
There is a couple of projects in the book that I want to start tonight! So that's it for blogging today!

Thursday, July 25, 2013
Monday, July 22, 2013
A Very Easy Pattern
For those of you who haven't been watching this blog I am afraid of sewing machines. After injuring someone with a flying bobbin I look on them as the enemy. But I am determined to learn to use my sewing machine! So I have been trying to make a skirt the last few months. So far I have cut three skirts too small using either just measurements or purchased patterns. One was being made of light weight white cotton and some lace curtain fabric. The white fabric was perfect but I cut the curtain fabric too short. So the skirt could still fit but wouldn't cover my knees. So my skirt pile is getting very big.
Then the other day I decided that I would try and make another skirt. I went to Beverly's and asked for help. After looking at the patterns I chose a very simple pattern marked EASY. So I still asked the opinion of one of the kind ladies there. She looked at the pattern and pointed out the word EASY on it and said I would be fine. The pattern called for light weight fabrics and in fact had an overskirt. So I went looking for some fabric and could not find two fabrics that I liked together. So I asked for help again. My question was could I use a light weight cotton instead of two sheer fabrics. She said yes, so I bought a beautiful cotton batik fabric. So armed with an EASY $6.00 pattern and $13.50 worth of enough fabric to make two skirts (just in case), I had my project for the day!
After going home I started the project immediately. I knew if I didn't start it that day it would end up in a pile! So I opened the pattern and happily saw that there were only two pieces to the skirt. My confidence rose. The pieces were very large because they were cut out of a single layer of fabric. That seemed strange but I put that out of my mind and shortened the pattern to my height. I started to lay the first piece on the fabric when I realized the skirt was cut on the bias! An EASY pattern should not be on the bias! But I remembered my mom saying "Just take your time and measure carefully". So I tried to lay the first piece when another problem came up. The fabric wasn't wide enough for the pattern! Looking at the pattern envelope it had a little note saying that the fabric would need to be pieced if it was under 60 inches wide. How could they possibly call this an easy pattern? So now I knew why the pattern didn't recommend cotton! The bias cut wouldn't drape as much in cotton as in lighter weight sheers. Then add to that the fabric piecing for the long skirt was outrageous! Some EASY pattern!
The pattern was now getting the upper hand! So I decided to make the shorter version skirt which just fit the batik fabric. Carefully laying out the fabric and measuring a dozen times I laid out the pieces one at a time because the pattern was so large. I cut the pattern pieces out and was appalled at how much fabric was wasted, but I did get a large triangle to make into a head scarf.
So finally I had all the cutting done so it was just sewing, which is the scary part! Sewing took only three hours not counting hemming. I've told this story to several people now and no one ever asked how I sewed a skirt and scarf without a properly working sewing machine. The answer was by hand. Yes I chickened out! After all that work I couldn't get up the courage to use the machine. Using a rocking needle technique I sewed the sides together putting a backstitch every 4th stitch. I actually think that I made a stronger seam then the machine would have done. After the sides the pattern had a turn down waist which was done with an almost invisible stitch. The hardest part sewing was the measuring of the skirt hem. Unfortunately I had to shorten the skirt more than I wanted but the hem was finally measured and I used a simple hemstitch. The total time counting both the skirt and scarf was 5 hours. Not bad at all and I got some good practice at hand stitching. The period clothing I have planned will be hand stitched so I really needed the practice. So if you have read through all of this here is a picture of the skirt and scarf. Maybe next time I will get out the machine!

Hand sewn batik skirt.

Batik scarf.
Sunday, July 21, 2013
Crewel World, Jacobean Style Pillow Tops.
Sorry I know that is an old joke but then so am I! For the French Altrusa tree I wanted to make some pillows. I wanted the pillows to look period as if someone in a 18th century home made them. This is what I bought more then 50 skeins of embroidery wool for a couple week ago. So yesterday instead of doing hundreds of tiny stitches on a needle painting I decided to make another pillow top. Using natural linen and wool threads this was fun and fast to work. Here are pictures of the pillow tops for the Marie Antoinette tree.


Jacobean stylized flower motif.

Jacobean stylized flower motif.
If they don't get used in Marie's tree I think I can find a home for them : ) I highly recommend the book "The Margret Boyle's Book of Needle Art" for those interested in crewel work. The book is only 160 pages so it does not go into great detail about any topic. However what she does write about is clearly written and has many good suggestions and tips. The book includes both canvas work and crewel embroidery. The canvas section includes Florentine design and how to figure out the pattern repeats. I would not suggest this book for someone just learning embroidery but the basics are included in the book. There are several lovely projects in the book but only with brief instructions. The project instructions include the colors and stitches to be used with referrals to the How To part of the book. This is not a book for those who need lots of pictures to learn new techniques. I plan on making several more projects from the book.
Friday, July 19, 2013
Thrift Store Finds for Altrusa
Today was a very lucky day for finding pretty things at the thrift store! It was like the stuff was waiting for us! Two weeks ago we found a copy of a 18th century French woodcut of a Ball. The store said they would get it down but still hadn't, they had no ladder. Lee found two in the store and after a bit they finally brought it down. Here are some pictures of it. I didn't want to take the glass off so the pictures aren't great. And it was only $5.00!


18th Century French Ball.
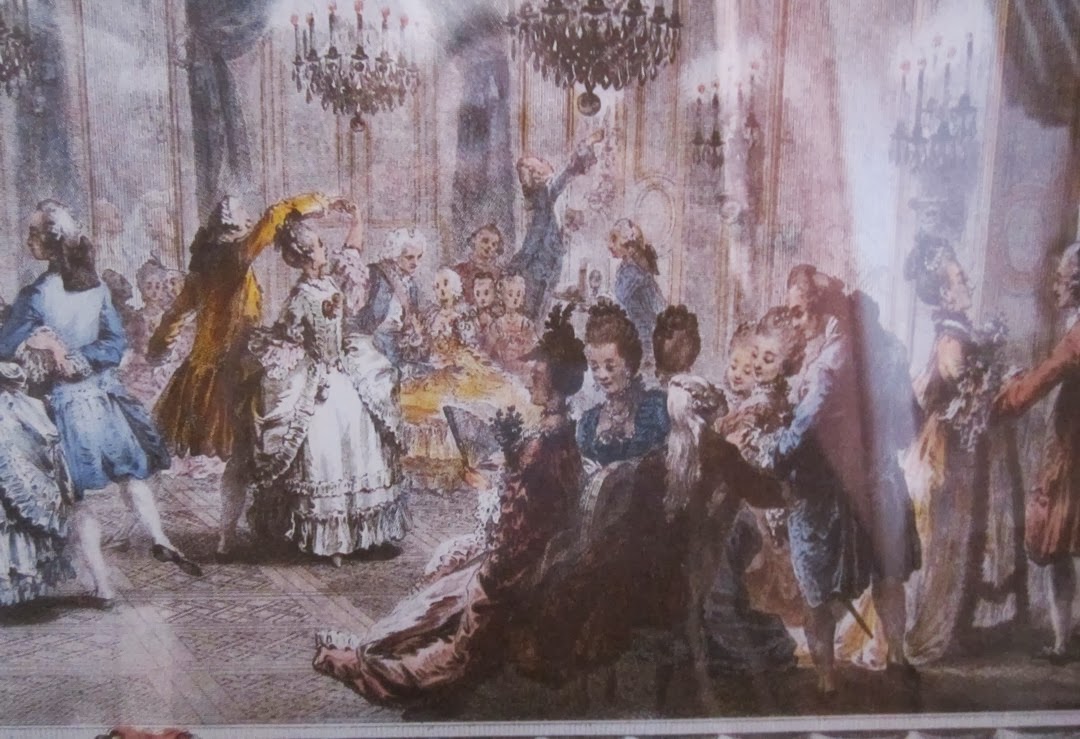
Close up of the party!

Close up of the other side of the party.
The frame was made of a plain thin wood. So we went to another thrift shop and found an ornate frame and it was the right size! The frame cost $7.00!

Here is a close up of the frame, the roses are so lovely!
I also found this lovely old frame. It is the right size for a large hand mirror. Just drop a mirror in and embroider the back!

Lovely old frame.
Then I found this old silver plate coffee carafe. The ornamentation is amazing.

Coffee carafe.

Etching on the silver on the carafe.

Ornamental scroll work.

The carafe in action!
A wonderful day for the Marie Antoinette Tree!
Tuesday, July 9, 2013
Interesting Slashing Technique
Yesterday I was watching some videos on youtube and ran into this sewing technique. The artists calls this a modern slashing technique. She took the idea from a Renaissance clothing technique of slashing a garment so that the cloth beneath shows. Her technique is a lot more freeform. She layers scraps of fabric between two solid layers of cloth and then sews lines and circles all over the piece. Then she slashes inside the sewing lines, exposing the under layers. Here are a couple of tutorials. Wish I had a working sewing machine!
http://www.youtube.com/watch?v=HaPsMLE2FQ8
http://www.youtube.com/watch?v=xiL19t56Xgk
http://www.youtube.com/watch?v=HaPsMLE2FQ8
http://www.youtube.com/watch?v=xiL19t56Xgk
Sunday, July 7, 2013
Found Marie!
After going crazy looking for her I finally found Marie in the paper racks. It was a very safe place because I didn't find the embroidery for several days. So hopefully I will get back to her tomorrow.
Lee took me out to buy some needlepoint wool at Betty's. I got 51 colors to add to the 8 colors I had already. So now I just have to decide on a pattern for a pillow. I've been looking at some patterns in "Needleplay " and "More NeedlePlay" by Erica Wilson. There are a few cute ideas. But I would really like to come up with my own designs. Certainly I have enough colors to make something quite colorful. Afterwards we went to a thrift store and tried to buy a litho of a ballroom dance set in the 1780's. The picture was screwed to the wall so they will call me when they can get it down! This will be great for the Altrusa tree! Then we bough some blackboard paint for some cabinets and came home.
Yesterday I started another needle painting. This is of a yellow poppy and it is going quite well. The next needle painting will be an iris. I found a nice outline drawing of an iris and this time I will pick the colors, shading and determine the stitch angle all on my own. Sounds like a fun challenge!
Saturday, July 6, 2013
A Lesson in Blogging and Needle Painting
Every once in a while when I'm looking at images posted to the Internet I actually see some of my projects. I love seeing what I've made and hoping that someone might be inspired to try the projects themselves. Last night I was looking at images of needle painting. Going through the images I recognised a quilt layout I had posted in my blog. The program that grabs images grabbed the quilt image instead of the needle painting picture near it. So from now on I'm going to try and keep to a subject so the images go into the right category. Just seems that blogs should be about a lot of stuff because everything in life effects everything else.
The needle painting exercises are slowly coming along. I was going to work on the Marie A. stumpwork piece but I put it somewhere safe which usually means that I will never find it again. Yes, I have looked in the freezer!

Some Thoughts on Needle Painting
Finally I finished the needle painted violet. The leaf alone took more than 700 stitches. The first try at it came out so badly I thought that I may not be able to learn the needle painting technique. But this violet came out much better. I am not actually able to keep up the long and short stitch. Starting out I create the long and short stitch along the stab stitched outline. The next row of stitches is where I start having a problem. When I start stitching the second row the obvious stitching pattern bothers me. So I usually start randomizing the stitch length and placement. I let my needle wander around but I always pierce back into the previous row of stitches. Every few stitches I like to take a stitch back two rows. This causes a blending effect, so to many longer stitches and you will loose the shading effect. Also I angle the stitches along the growing pattern for the plant. To angle the stitches correctly I find looking at a flower or a picture of one helps. Getting the angle of the stitches seems the hardest part of this technique. Another tricky part of needle painting is choosing colors. Colors that are to close can blend into each other so that it doesn't look like you've shaded at all. Like most techniques it just takes practice. A good book helps too!
The needle painting exercises are slowly coming along. I was going to work on the Marie A. stumpwork piece but I put it somewhere safe which usually means that I will never find it again. Yes, I have looked in the freezer!

Needle Painted violet, lesson 5 from
Needle Painting Embroidery by Trish Burr.Some Thoughts on Needle Painting
Finally I finished the needle painted violet. The leaf alone took more than 700 stitches. The first try at it came out so badly I thought that I may not be able to learn the needle painting technique. But this violet came out much better. I am not actually able to keep up the long and short stitch. Starting out I create the long and short stitch along the stab stitched outline. The next row of stitches is where I start having a problem. When I start stitching the second row the obvious stitching pattern bothers me. So I usually start randomizing the stitch length and placement. I let my needle wander around but I always pierce back into the previous row of stitches. Every few stitches I like to take a stitch back two rows. This causes a blending effect, so to many longer stitches and you will loose the shading effect. Also I angle the stitches along the growing pattern for the plant. To angle the stitches correctly I find looking at a flower or a picture of one helps. Getting the angle of the stitches seems the hardest part of this technique. Another tricky part of needle painting is choosing colors. Colors that are to close can blend into each other so that it doesn't look like you've shaded at all. Like most techniques it just takes practice. A good book helps too!
Tuesday, July 2, 2013
Wild Pansies Finished
Slowly I have been doing the lessons from "Needle Painting Embroidery" and finally finished lesson 10 Wild Pansies. The projects get harder as you progress and use many more colors. The trick to doing these lessons is the long and short stitch. I have found the long and short stitch difficult to do because my hands shake and doing precise stitching takes four or fives tries to get the needle in the right place. So I am actually doing a more random stitch which gives more of a blending effect. The wild pansies took about 16 hours to stitch. The original colors from the book were red violets with a bright pink added. So for this lesson I picked out the pansy colors myself. I also changed the way the pansy face looked. It is a lousy picture below because I am still learning how to use a new camera. Even with the cameras ability to take my shaking into account this was the best picture I got. The background is white so the camera is having some problems. It does feel good to get the first square embroidered for the quilt. Just need 19 more squares. The next square I want to try is an orchid design based on the most resent orchid in my collection. Just need to get the drawing right. Until then I think I will finish the Marie picture.


Wild pansies.
Monday, July 1, 2013
Back to Embroidering Pansies
Yesterday I went out to shop at Michael's. This was a bad idea for several reasons. The heat yesterday was hot for us and being out 2 hours was hard. The coupon was for 40% off the entire purchase starting at 4:00 PM. So I went a bit early and there were only 6 people shopping. So I managed to get through the crowd of shoppers! I was able to find some lovely white flowers for a bridal head wreath. The plan is to finish the wreath in the next couple of days. Then I went to the frame section and was a bit disappointed that they didn't have many old style frames. I finally decided on this fake Marcasite frame with fleur de lys at the corners. The frame is 5 x 7 inches and that turns out to be as small as shows all of Marie. It also cuts out a lot of background that I would have had to embroider. So I am rather happy with the frame. While at Michael's I also bought some embroidery floss for me.

It was exhausting to go shopping but I have enough supplies for now. To give my sore fingers a break I worked on the wild pansy some more. The colors are different from the lesson because I hated the colors the author chose. The original was in Anchor threads so the DMC equivalents may have just been off. So this is my first try at picking out colors. Not quite right but pretty enough. When this is finished it will be the first quilt square for the embroidered yoyo quilt!


Frame for embroidery.
It was exhausting to go shopping but I have enough supplies for now. To give my sore fingers a break I worked on the wild pansy some more. The colors are different from the lesson because I hated the colors the author chose. The original was in Anchor threads so the DMC equivalents may have just been off. So this is my first try at picking out colors. Not quite right but pretty enough. When this is finished it will be the first quilt square for the embroidered yoyo quilt!

Needle painted wild pansy lesson number 10.
Subscribe to:
Posts (Atom)