Showing posts with label tutorial. Show all posts

Saturday, April 13, 2013

How to Make Fabric Dorcet Buttons and Spider Web Roses

 
Dorcet fabric buttons.


I was learning how to make Dorcet style buttons yesterday and today.  My reference books for learning were "50 Heirloom Buttons to Make" by Nancy Nehring.   A great book with lots of button types and histories.  Also used was "The Button Maker" by Sarah Beaman.  "The Button Maker" has good illustrations and instructions.  I find that the two books are very complimentary.  I highly recommend both books.

Dorcet buttons are made of fabric with rings that help them keep their shape.  They are basically a yo-yo that has a ring inserted and then the yo-yo is closed.  The Singleton button is made the same way but has an added backstitch around the inside of the ring to keep the ring from moving.  Singleton buttons were made by the Singleton family and were embroidered with daisies according to Sarah Beaman's book.

To make Dorcet buttons start with deciding what size to make them.  I decided on using 1 inch plastic rings for the sample.  Both authors suggest the outer size of the button fabric be 2.5 times the size of the ring.  The fabric should be a closely woven fabric but not to thick.  If there is any chance that the fabric may shrink when washed, please prewash it.  In the sample I used a silk taffeta.   I wanted to embroider mine so I drew two circles, one a 2.5 inch circle and then another 1 inch circle in the center. 

So with my taffeta fabric marked and in a hoop I embroidered three leaves in a kind of Celtic design.  The leaves were stitched in herringbone using three shades of green cotton floss.  Then I decided to make spider roses using 4mm pink silk ribbon.  Spider roses are very delicate not the best choice for buttons, but I am not making these washable.  Be sure to read the limitations on the fabrics, rings, threads and ribbons you use.


Green embroidered leaves for button.

 
Embroidered leaves and Spider Roses.

How to Make a Spider Rose
.
To make a spider rose draw a circle a bit smaller then you want the rose to be.  Then from the center of the circle fasten a thread matching the ribbon color.  I wouldn't use a standard knot because it might show.  I make a stitch and then pierce though it with the needle to lock it in place.  Next use a long stitch and stitch from the center of the rose to it's edge.  Repeat this remembering that you need an odd number of stitches and try to make them evenly spaced.  The long stitches form the web for the spider rose.


Spider webs stitched as first step of making a spider rose.

Now for some fun!  Sometimes I start by sewing a tiny 3 mm crystal in the roses center.  But this time I will just make a standard rose.  Thread a small tapestry needle with the 12 to 14 inches of 3mm silk ribbon and bring it through the fabric near the center of the rose.  Remember that the silk is delicate and will start fraying if to long a piece is used.  Pull the ribbon through the fabric leaving a small tail. 

 
Silk ribbon brought up near center of spider rose web.
 
 
Weaving started, beginning of spider ribbon rose.
 
 
Weaving continues.
 
 
Spider ribbon rose partially woven.
 
 
Twirling ribbon to create more realistic petals.

Then weave the ribbon over and under the web threads.  This is done very gently, if you pull the ribbon to tight it will not make a pretty rose.  Once the center is woven you can twirl the needle curling the ribbon.  The curled ribbon makes interesting petal shapes and makes the rose more roselike.  Then straighten the ribbon for the last round of weaving.  Sometimes if the rose is uneven I will stitch a petal or two around it. 

 
Sewing the ribbon ends to secure them to the back of the embroidery.
(I have long stitches of pink on the back, I ran the thread across rather then beginning and ending the webs separately.)


Then pull the ribbon back through the fabric.  Clip both ends of the ribbon and sew them together using the web thread.  There are other ways to do this but I like the security of sewing the ends.  Sometimes I stitch into the ribbon roses very gently just to secure the petals.  It is a bit tricky not to leave a stitch showing but it makes the roses more durable.  It also gives an opportunity to shape the spider rose.  Finally I decided to stitch some rocailles beads one at a time around the embroidery and within the 1 inch circle.  The button remind me of little tiles.

 
Stitching the beads on using silk beading thread.
 
 
Finished embroidery.
 
 
Making the Dorcet Button
 
With the embroidery finished now comes the button making.  I was a bit worried at this point because I was unsure that all the beads were inside the 1 inch circle.  Now instead of cutting the fabric at the 2.5 inch circle I decided to try something different.  I took the small yo-yo maker by Clover and placed the top piece over the embroidery.
 
 
Embroidery seen through the top part of a Clover yo-yo tool.
 
This turned out to be trickier then I though it would be. The ribbon roses crush easily and the beads were slippery. But I gave it a try and cut around the yo-yo tool leaving about a 1/4 inch of fabric beyond the tool.  Then I put Stop Fraying by Aleene's on the edges of the silk and let it dry. 
 
 
 Stop fraying was put on the edges of the button rounds.
 
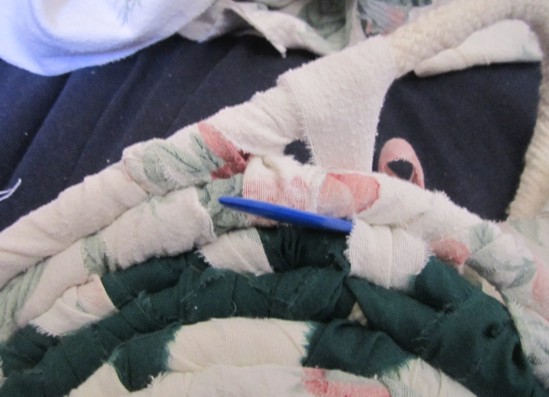
After the fabric dried, I tried to but the yo-yo tool on but the embroidery was to thick.  So I held the two parts together gently and stitched around the yo-yo tool.  It was a bit hard to do because the tool kept slipping.  But it came out great because I was extremely gentle.  Using the yo-yo tool should work better with a less delicate and 3D embroidery. 
 
To form the button without a yo-yo tool stitch a running stitch around the fabric circle about 1/4 of the depth from the edge.  The trick here is to leave enough fabric to push under to secure the edges.  But also to leave enough fabric to close the fabric circle.  You may need to run the gathering thread a couple of times to get it right.  Remember to place the 1 inch plastic ring inside the button before closing it tightly.
 
 
Pulling the running thread to form the button.
 
After pulling the yo-yo closed, making sure the fabric edges were tucked inside as well as the 1 inch plastic ring.  The trick is to pull the thread and then loosen the gathering and spacing the fabric evenly.
 
 
Gathering the button.
 
Finally I ran the thread around the close for extra strength.  If there is still an opening you can run stitches from top to bottom and side to side.  If there is still a whole or you want a neater back, stitch a piece of fabric over the opening.
 
 
Running another gathering thread to help tighten the button opening.
 
 
Closing the button opening.
 
To use the button simply sew through the button onto the garment.  Another way to attach the button is to use a button safety pin.  I hope that this will inspire and help with making fun and unique buttons.


Thursday, June 14, 2012

Making a Rug from Sheets

Well the project has decided to be a rug.  It is made from two sheets.  One a dark green cotton and the other a flannel with a rose pattern.  There is a little trouble with the tension and keeping it flat.  When it is finished I will go back with some cotton quilting thread to reinforce it.


Close up of sheet.

As part of organizing the house I was trying to see what I could do with old sheets. Earlier this week I gave up and was going to take the sheets to the Goodwill. Then I remembered the cotton core rugs. The flower sheets were the first set I bought for myself, and I love them. So I wanted to keep them a little longer if I could. They are over 20 years old but still have some life to them. If this rug works out I have a lot more sheets that need to be recycled.


Close up of rug.


A closer look it is really cute!

Some how to pictures. 


How to start


Picture of toothbrush tool.


Start by wrapping the cotton cording with fabric.


Bend the wrapped cording into a rounded shape.


Keep coiling the wrapped cording until there is enough
coiled so that you can start sewing into the previous round.


How to weave the rug.


The 1 inch sheet strip is going under the cotton cording.


The fabric is being wrapped around the cording two or
three times with a little overlap.


Next the fabric is pulled back to front through a space
on the previous round.  You can see the blue
toothbrush tool.  It makes this step really easy.


Fabric being pulled to the front of the rug.  I am
making the strips the full length of the sheet.


Final step the fabric is on top of the rug.  It now needs
to go under the cording and starts the wrapping again.

I hope that someone is inspired to try this easy rug making technique.  The cording was 29 cents a yard and the tool was $3.00.  All together the project was under $10.00!  Not bad for such a pretty rug!  If you would like more information please leave a comment.


Wednesday, June 13, 2012

Rug or Basket?

Now that I'm finally done with chocolate, I'll share other stuff I've been doing.  I have been working on a bracelet design and learning to use a snowflake frame.  Neither has been working out!  I'm half way through another book tutorial, this one is an accordion style with a secret! 

So I thought I would go in a completely new direction.  I am trying to make a big soft basket or a rug.  Today I bought 20 yards of cotton cording for the base from Beverly's Crafts here in Santa Maria.  They had several sizes but I got the 1 inch diameter cording.  It is very soft so it would probably be better as a rug.  At first I thought of using some cotton yarn for the weaving.  Now I'm thinking of tearing up some fabric that I bought a couple years ago to make rugs with! It was under $3 a yard so that isn't to bad.  There are also a lot of bed linens that need to be recycled.

Right before the wedding I bought a toothbrush rug tool so I may try that method.  There is a nice video on making toothbrush rugs.

 http://www.ragrugcafe.com/toothbrush-rugs-complete-video-instructions-part-1-beginners

Always too many projects!  We will see if I can make rugs this week!

Chocolate Truffles Recipie III

Now that the truffles are shaped and cold it is time to dip them into more chocolate!  What could be better than that!  Dipping the truffles is not that difficult, but tempering the chocolate can be.  Below is a technical description that I wrote several years ago.  This is not the only way to temper chocolate.  There are easier methods.


Tempering is the process that causes chocolate to form crystal giving it a shine and crisp texture. Tempering starts by melting the chocolate to a specific temperature, letting it cool, then heating it again. It takes time and an accurate digital thermometer to temper chocolate. For bittersweet chocolate heat to 118 to 120 degrees. milk chocolate heat to 116 to 118 degrees. When the chocolate comes up to the proper temperature remove the top of the double boiler and let the mixture cool to 80 degrees for both types of chocolate. Stirring will speed up the cool down process. Then replace the pan on top of the double boiler over simmering water and reheat. For bittersweet chocolate bring the mixture up to 88 - 91 degrees. For milk chocolate you want 85 to 87 degrees. During the whole process the chocolate should be watched carefully and stirred often. After the chocolate is at the correct temperature you must keep it within the temperature range while dipping the truffles.


For more technical information see my site www.craftersnotes.com


Working now with an understanding of what tempered chocolate is we can cheat! 


Cheaters Never temper!


If the chocolate you are dipping with is already in temper gently melting it to the proper temperature for that kind of chocolate is all you need to do.  So check your chocolate for these signs of being tempered, crisp when broken, no grey streaks, shiny and not melted.  If any of these signs appear either temper the chocolate or use it to make another batch of truffles centers.
If you decide that you don't want to bother with this you can buy candy melts to dip the truffles in.  There are different qualities of these on the market so go with the best tasting you can find.  These will not leave a crisp chocolate shell when you bite into them but they also won't melt immediately in your hand either.  If you want to learn more techniques see my site or do a search for tempering chocolate.


Once the chocolate is melted you need to keep it with in the temperature range for that chocolate type.  So it is recommended that you have the truffles at room temperature before dipping.  That is the proper way to dip.  I don't do that.  When I dip truffles I drop the frozen centers into the chocolate.  This means that the chocolate can loose its temper and it will need to be warmed up more often.  This is one of the things you just need to practise at and at first a thermometer helps.  As the chocolate cools it will get thicker which is a great clue to reheat it.  Some people use a heating pad under the chocolate to keep the temperature even,  Just be sure to cover the pad so you don't ruin it.  I just take the whole double boiler to my dipping area, then reheat the bottom portion as necessary.


Drop the truffle center into the chocolate then immediately remove it with a candy dipping tool or fork.  Make sure it is completely covered in chocolate and then shake the excess chocolate off.  Gently brush the truffle across the pan lip to get rid of the excess chocolate from the bottom of the truffle.  Then tip the tool or fork so that the dipped truffle rolls off onto wax paper to dry.  If you have a little extra chocolate left on your tool you can add a swirl or repair a damaged truffle.  Sometimes the truffle sticks to the tool, that is because he truffle is still to soft or the chocolate is to hot and melting it.  Try putting the truffles in the freezer for minutes and try dipping them again.  Also check the melted chocolates temperature.  This is just a skill that needs to be learned, but if you do you a wide range of candies can be made!


Good luck!

Tuesday, June 12, 2012

Chocolate Truffles Recipie II

Now that the truffles have set the fun begins! You will need a spoon or a melon baller is better, to scoop out the truffles. Some wax paper or board to work on and lots of cocoa powder to keep the truffles from sticking to you.   I like to use a plate that can go in the freezer and can fit in a sealable plastic bag to put the finished truffles on.  This is just to firm them up, take them off the plate to store.

Now is the time to decide on how to finish the truffles. You can chocolate dip them which will be tomorrows blog. The classic finish is just to roll them in cocoa powder (my favorite).  But you can also just roll them in something. For instance finely chopped nuts, sprinkles or cookie crumbs. I like to put Oreos in a food processor and grind them fine and roll the truffles in it. However the cookie crumbs go stale fast so I only do that right before serving.

If you put the truffle mixture in the refrigerator you will need to let them sit an hour or more to soften. If you don't wait you can really hurt your wrists. If you left them on the counter overnight they should be firm but easy to make rough balls shapes.

Sometimes when you have accidentally stressed the mixture you will see pockets of yellowish butter or even cocoa butter. This is not ruined! 


You can see that the mixture separated slightly.

My first try did this and you can still use it. Just remove the fat pockets as you spoon out the chocolate. The worst that happens is that the chocolate is not evenly set so that there are harder bits like chocolate chips. I remove the larger of these bits while rolling the truffles. The bits just add texture to the truffles. No one has ever complained! But if you feel uncomfortable using the mixture it can be gently remelted, and try again. Or it can be saved in the refrigerator and scooped out and made into the best hot chocolate!

Once the chocolate mixture is firm spread the cocoa powder on the work surface, if you use a sieve it will take less cocoa powder to roll them. Then use a spoon or melon baller to scoop the truffle mixture and place onto the work surface. Be sure everything including your hands has been dipped in the cocoa powder. 


Dropping bits of truffle mixture onto cocoa powered surface.

If you have hot hands this can get tricky. Once you have a lump of truffle mixture spooned out try to form it into a ball. Use your hand, trying to roll with the part just below your fingers. Use light pressure and roll the mixture into a rough ball, by rolling it on the work surface. Usually the first one just melts on your hand, it takes some practise. You may need to wash your hands often during this process, but if the mixture is soft and melting it may just need to firm up more. Being to soft and melting also means fewer truffles!


Rolling a truffle.


Rolling a truffle.

At this point if you are not going to dip the truffles in chocolate you can roll them into nuts and other toppings. If the toppings don't stick warm the truffle in your hand and roll in the topping again. If you are going to eat them soon place them in the refrigerator and take them out one hour before eating. For long term storage, they can keep up to a month if frozen. I freeze them over night and then dip them the next day. Tomorrow I will post on how to dip chocolates. If you want to learn more you can go to my site at


Truffles ready for the freezer.

Monday, June 11, 2012

Chocolate Truffle Recipe

Today is a chocolate kind of day.  I have no idea why but I'm going to start some truffles.  If you have never made your own truffles you are really missing out!  So let's get started.

This is a two day process, you can make them quicker but will get a smaller yield.  First you want to get a pound of the best dark chocolate or bittersweet chocolate that you can find.  From 50 to 70 percent cocoa mass.  If you want to chocolate dip them you will need at least another pound.  You will also need 1/2 cup unsalted butter and 1/2 cup of cream, and the best vanilla.

To start you can either melt the chocolate over a double boiler or the microwave.  Chocolate has two enemies heat and moisture.  So only use a double boiler that is tightly sealed and will not expose the chocolate to steam.  Once the water is simmering in the bottom, place the broken up chocolate in the top of the double boiler and take it off the heat.  You may need to reheat the bottom of the boiler a couple more times before the chocolate is completely melted.  The goal is to melt the chocolate not to get it hot.  Stir after 15 minutes to see how melted the chocolate is.  The smaller the chocolate has been broken the faster it will melt. 

To melt in the microwave can be faster but needs more care.  Use a heat tolerant glass bowl and place the broken up chocolate inside.  Heat the chocolate for very short bursts.  I heat for 30 seconds at a time.  You aren't trying to heat the chocolate as much as heat the bowl.  What I mean is that the warmth from the bowl should do most of the work.  You will need to stir often so as not to burn any of the chocolate and to make sure it is heated evenly.  You are trying to just melt the chocolate not get it very hot.  Warning over heated chocolate will explode in the microwave and make a horrible mess.

Whatever method you use to melt the chocolate once it is close to being melted start the butter and cream in a sauce pan.  This is to get the butter melted and gently scald the cream.
When the cream is scalded and the chocolate melted pour the cream into the chocolate.  Gently stirring and folding them together.  Only stir to the point that the cream mixture is smoothly integrated into the chocolate.  Add as much vanilla as you like,  I use up to two teaspoons this amount differs according to taste and how much vanilla was in the original chocolate bar.


Chocolate and cream mixure being mixed together.
Let the mixture sit to cool.  If it is still hot stir again in 10 to 15 minutes just to help it cool it also helps to keep the mixture from separating.


Finished mixing.

That's it!  Really simple to make.  Once cool allow to sit on the counter overnight to get firm.  Or you can put it in the refrigerator but the colder it is the harder it will be to form into truffles.  So if you do refrigerate the mixture leave it out to warm up before trying to shape them.

Tomorrow will be how to shape and dip truffles!  If you can't wait there are more detailed instruction on my website www.craftersnotes.com.  Just click on the chocolate button.

Saturday, June 2, 2012

Stumpwork Dragonfly wings 2


Finished edge embroidery of wings.


Finally finished embroidering the wire outlines on the dragonfly wings.  Now to embroider the veins inside the wings.  This is a little more delicate than the outlines.  It is important to take tiny stitches because the sheer fabric shows everything.

You can use the same thread as the outline but it can be more fun to use a metal thread.  Black is also a good choice but is very stark against the organza.  For my dragonfly I decided on a fine silver thread from DMC.  It is tempting to take some seed beads and sew them to the wings for a stained glass type of effect.  Maybe next dragonfly!

So I used buttonhole stitch on top wings but it came out looking rather random.  So for the bottom wings I tried a sort of ray like structure and put a silver plated seed bead on each.  Just have to get those beads in somewhere.


Embroidered veins on wings.


Next comes the really unnerving bit, it is a good idea to have a bottle of fray check handy.  I don't like to use it because it can change the work color or harden the fabric.  But it can save your work!  Take the organza out of the hoop.  With good lighting and a pair of small sharp scissors cut around the wings as close to the edge as possible.


Cutting a wing out of the organza.


You can breathe again!  Once all the wings are cut out is is time to get the second frame ready.


Here is the outline on my base fabric.  Those are flower shapes not kidneys.


The base fabric should be pretty and strong.  Many embroiders choose a silky or satin type of fabric.  I chose a poly/linen white fabric.  You will also need a piece of muslin.  Stumpwork is embroidered through both pieces of fabric.  So you can either tack the fabrics together working from the center out or if you have a really good hoop just place them together.  So with the outline on the top piece you can now embroider the dragonflies body.

Starting with the abdomen you can choose a fiber or use beads,  I found a long silver tube and stitched it to the fabric with the silver thread.  Remember avoid knots and lock the thread by making a small stitch and bringing the needle up through the stitch.  I also added pincher's at the end but they didn't show up.

Abdomen added to fabric.


Now it is time for the wings.  Separate the wings into left and right.then bend the wires 90 degrees,  push the wire through the fabric where you drew the wings.  If  getting the wire through the fabric is difficult use an awl or large needle to punch a hole first.  Once the wings are where you want them bend the wire flat against the back of the hoop.  Next sew the wires to the back of the fabric.  I used a heavy quilting thread, wrapping around the wire and biting into the back of the fabric.  The wires should be attached to the fabric but should still allow the wings to move a little.  Move the wings to the shape and angle you want.  Now with a chenille thread embroider the thorax.  This will stabilize the wings.  Use a needle that is just big enough for the chenille.  I stitched three straight stitches across.  Then two stitches from the top of the thorax to the bottom.  Finally two stitches on the diagonal,  I think it looks cute and bit furry, the color was accidental because it was a multi colored piece of chenille.  The color couldn't have come out better if I planned it.


Wings added to fabric.


Thorax added to fabric.


Now for the head.  I like bead heads especially the iridescent ones.  My dragonfly looked good with a pearl finished size six seed bead and two size 11 metallic rainbow teal beads for the eyes.  I used heavy quilting thread to sew them on.


Seed bead head and eyes sewn to embroidery.


We are almost done!  Finally to embroider the legs.  I used a thick black wool and straight stitches.   I did need to move the wings a bit to get the legs embroidered.  Done!


Finished dragonfly.


The finished dragonfly is 1.5 inches by 2 inches.


Friday, June 1, 2012

Stumpwork Dragonfly Wings

Embroidering dragonfly wings is probably the trickiest part of a stumpwork dragonfly.  But it isn't as bad as it sounds.  This is not really meant to be a tutorial but just some hints to help.


Some fun fibers.

The first thing to do is to choose the materials.  Which can be  hard when you have so many choices! You will need a small piece of organza.  A thread that will complement the organza, this will be for the wing edges.  A small hoop, straw or other fine needle.  Some fine wire, around 26 gauge should be flexible enough. You may also want a different thread for the veins on the wings.  Can't forget some beads for the eyes and head.  My dragonfly uses bugle beads for it's abdomen.


Cotton floss.

Decide what color you want the dragonfly wings to be.  You will need organza in the dragonflys color.  This limits your color choices but the wings look great in organza.  Or choose a white and then embroider with a colorful thread.  You may also want to get organza that is extra sparkly  after all it's a dragonfly!

Once you have the organza you need to draw dragonfly wings on the fabric,  These will be freestanding in the embroidery so space them apart for ease of working.  I use a pen on the fabric, I know you shouldn't but it is hard to see light lines on organza.   Just keep drawing until you have four wings.  You will need them to also be right and left or opposites of two of the wings.


Dragonfly wings drawn on organza.


Put this in a tight hoop.  Now the fun begins.  Take and cut the 26 gauge wire long enough to go around the wing and add 2 inches.  Cut with wire cutters.  Start to roughly shape the wire to the outline of the one wing.  The wire ends will be together at the narrow point, this is where the wings attach to the dragonfly.  This doesn't need to be exact because you will shape while working it. 


Shaping wire to dragonfly wing.


Once you have a good shape you can start embroidering.  This is fine stitching so you will need only one strand of thread.  Cut embroidery thread between 12 and 18 inches.  It's better to have to add another thread then to have worn looking threads.  I start by making a small stitch on the outline and then come up from the backside and split my stitch.  This will take the place of  a knot.  Never use knots because they can pop to the front of the work.  Place the wire on the fabric and roughly couch over the wire shaping it as you go.  It always feels strange starting because the stitches are so tiny and the fabric so fragile.  But keep with it because once the wire is couched to the fabric it gets easier.  A lot of people take the end wires through the back of the fabric, I don't because then you can't see them and the thread gets tangled in the wire. 

Once the wire is couched you will need to embroider over the wire.  I find it easier to get a neat stitch if I slightly angle my stitches.  When coming up angle from under the wire and up, then when stitching down angle slightly under the wire.  It really helps to angle the stitches but if that is hard just stab stitch up and down.  Be sure to work over the beginning thread neatly,  These wings have to be as beautiful as possible and small details are essential.  No messy backs!  Repeat on other wings.


Couched wire being embroidered with one strand of turquoise thread.


Embroidered dragonfly wing.


Back of dragon fly wing.