Sunday, September 14, 2014

Another Day another doily


Finished doily.

Last night I finished the current doily, it's official name is Jolie Decor from Magic Crochet number 133, August 2001.  It came out alright for once I didn't have to fight to block out the doily.  One of the perks of using such an open design.  The doily didn't even use up the whole ball of thread.

In the afternoon we unearthed some of my yarn which was surprisingly undusty.  Found some real treasures including over 800 yards of wet spun linen..  There was also nearly a dozen forgotten crochet hooks including some really nice wooden ones.  The problem is which projects to ravel and which to keep working on.  There is a spider pattern throw about a quarter finished and a really lovely afghan made in different colors and yarn types including a sweater I raveled from the Thrift Store.  I even found a hat I knitted 14 years ago and never finished putting together!

I really love crocheting, it is an old friend but I just get into too much trouble with this hobby.  So now it is just a quiet Sunday afternoon and I really don't want to do anything.  Perhaps I will start another doily!

Saturday, September 13, 2014

Doilies Old and New

Recently I started crocheting again.  Not the best thing for my hands but I do enjoy crocheting very much.  The last county fair I entered a square pineapple doily and it won a first place!  The only reason I won first was because I used size 30 thread and the second place winner used 10.  Because the second place piece was a truly beautiful Filet of Mary.  It was nice to have a real competition.  

Square doily during starching process.

Our local judges won't even consider a piece unless it is well blocked and startched.   First I washed it and soaked the doily in a cornstarch mixture.  However when I laid the doily out to dry it became apparent that the starch mixture was too weak.  So once I had the doily blocked I used canned spray starch to finish stiffening the project.  Personally I like my doilies lightly starched so they are softer to the touch.

One project this year has been to try and get my craft area in order and move my projects out of the bedroom.  I keep all my projects in bags to protect them but it is always the open bag that gets a drink knocked into it!  So organizing has taken some time.  However I have found some things I had put away in the wrong spots which is nice.  One find was the above doily sister.  I have made this doily 4 times now.  Here is a picture of the doily I made for my mom.


Same pineapple doily made 25 years ago.

Even without starching the doily you can still see how much my crocheting has loosened up over the years.  The doily was damaged when my mom set it on fire with her cigaret and then my nieces colored it with magic markers.  So I tried for a long time to get the stains out and then just put it away.  Now that I have found it again I want to make it into something.  What the doily will end up is anyones guess!

Currently I started a new doily, I'm making it as a gift.  The design is very open compared to the denser designs I usually choose.  It has worked up in 5 days instead of 3 months which is nice.  I'm on the last two rows.  Unfortunately the cat decided to help and now I can't find the hook!  Well there are still a few days to finish it and I'm sure it will turn up.  One thing I have learned about crocheting, try not to use another hook even the same size and company because they are all a little different!


Latest doily is a gift.

Monday, June 9, 2014

Hopefully Back for a While!

The last few months I stopped blogging to get some real crafting done!  It was nice to have some time crafting without trying to get good pictures and edit them and then documenting what I did.  Just to enjoy making lovely things ( in my opinion) and design future projects.  I also enjoy blogging and sharing ideas with others so it is time to start to enjoy blogging again too!  Unfortunately I did not get pictures of all the things I made but I will share pictures of those I did.


Recently I went back to http://www.craftster.org/ and got involved to a Spirit Doll Swap.  Here is the gallery for the swap.
 http://www.craftster.org/forum/index.php?topic=433511.msg5196183#msg5196183 

Craftster is a great place to find a swap and has a great variety of them to choose from.  I had been wanting to make a doll for a long time and so the swap was a great way to get inspired.  Here are some pictures of the doll I made and represents "Living in the Moment".


Spirit  Doll "Living in the Moment".


Close up of doll.

To start the doll I first folded a piece of paper in half and cut out a paper doll.  It took several tries to get the proportions right I wanted her to have an enormous butt.  I was going for a goddess shape but a bit different.  Once I had a shape I decided on the pedestal leg shape to accentuate the enormous butt.  Then I decided to have separate arms so I could pose them, but that didn't work out.  My partner for the Spirit Doll swap like jewel tones so I decided on a bright red, I wanted to use purple but that would have made the doll darker than I wanted.

So next I marked the body on a piece of red fabric and put it in a q-snap and started to embroider it.  The body was embroidered with two strands of embroidery floss creating a one wrap french knot in a circular spiral pattern.  The circles had a center and then about six French knots around them but I made at least one a different color that started another circle.  So there was a pattern but not an obvious one.  After I cut out and sewed the embroidered pieces I was almost stumped with  the next challenge.  When the doll was stuffed it was too tight to do any soft sculpture on and I didn't like the flat face and butt.  So I created yo-yos out of the red fabric and sewed them to the butt and face and stuffed them so the doll was more dimensional.


Close up of dolls face after applying the yo-yo, embroidered eyes and face.

The yo-yos worked out great but they did leave a seams.  I embroidered the face with matching silk thread and so the nose and mouth are very subtle.  The eyes were outlined with straight stitches and then embroidered with white silk sewing thread.  The eyes are Swarovski crystal  montees in blue.  I had some montees in red but they would not show up as well.


Close up of dolls hair in back.

The hair came next.  I sewed several layers of silk ribbon in red and purple, a yellow boucle embroidery thread and red eyelash knitting yarn.  There are also strands of purple size 10 seed beads and size 15 red seed beads on top of the hair.  I wanted the hair to be wild so I spent hours adding more and more to the hair.  Unfortunately I strung so many beads that she is top heavy.


Close up of dolls arm.

So with her face, body and hair done I started working on the arms.  At this point I almost gave up.  It took four tries before I even got this nice an arm.  One try looked like a claw and made her look like a lobster!  I finally settled on this arm and hand embellished it with green rayon Brazilian thread and couched it to the doll with single chain stitch leaves.  Finally using the spider rose technique created lovely yellow silk roses to finish the arms.


Close up of enormous butt.

With the doll almost finished I decided that the butt shouldn't  be done in french knots.  I wanted her bottom to stand out so I did a simple running stitch in same colors as I used for the French knots.  The running stitches are also rather randomly made to match with the randomness of the rest of the doll.   


Clothes just didn't work for this doll.  Everything I tried something on her just took away from spontaneity of the doll.  So to dress her up I decided to make her some Ferengi earrings.  unfortunately I didn't get a good picture of the earrings.  The basic difference that makes the earrings "Ferengi" is they are connected to each other with a chain that hangs down like a necklace and has dangles.  These were very simple.  At each ear is a clear crystal cut into a leaf shape with a gold chain connecting them.  It had only one drop a lovely dark amethyst at the middle of the chain.  So with the doll finally finished I sent her to her new home!  I experienced a real challenge making a doll pattern for the first time and working with a woven fabric instead of a knit.  Hopefully there will be another Spirit Doll Swap soon.  In any case I signed up for the County fair and "Art Doll" is one of my entries!

Wednesday, April 16, 2014

Victory Garden 2014

You would think that after all the hard work last year I would skip a year of vegtable gardening but I'm not that smart!  After such a warm winter we were able to start clearing the garden in Februrary and planted 22 tomato plants in early March.  He bought 6 packs of grape tomato, a beefsteak and a medium size salad tomatoes.  Yesterday he came home with mystery tomatoes that lost their tags!  Lee has been working on the garden using the tiller and has cleared almost 3 times the space we had last year.  Already the seeds have started growing and we have a larger selection of plants.  So far we have planted crookneck squash, peas, beans, head lettuce, leaf lettuce, beets, small carrots and multi colored carrots.  The garden has provided volunteer pumpkins, tomatoes, arugula, cosmos and sunflowers!   Here are a few pictures!


I planted the basil but the sage survived the winter and has a lot of bees visiting.
 
 
Small basils in a pot.
 
 
Only one pumpkin seed germinated from last year so I planted some more to keep it company.
 
 
One of 22 tomato plants!  They are all looking happy and blooming already!
 
 
Green peas popping up in the garden.  I planted a six foot row so we should get quite a few peas.  I couldn't get more pictures off the camera so I'll have to post the vegetables later.
 
This year I decided to have a real flower garden and a potted garden of small plants and miniatures
 
 
A pot of lovely violas in yellow and purple and orange and purple.
 
 
This is a 4 inch pot of purple violas.  I love how bold the colors are in such a tiny plant.
 
 
Tiny viola in purple with a delicate white face.


I love these yellow violas they are bigger then the others and have a delicate purple edging to the petals.
 
 
In the vegetable bed a small forest of cosmos have come up from reseeding themselves!  I've already transplanted over 4 dozen and still have more to give away!
 
 
Several purple irises have bloomed and each plant has had 7 blossoms.  They are more than 2 feet tall.


The snapdragons survived the winter and are blooming like crazy.  These are in the main flower bed with the irises.


Lots of violas in the main flower garden!


Yellow roses.  They were New Years gifts for 2013.
 
 
California poppies!
 
 
Mr. Lincoln rose.


First Persian jewel to bloom.  There are some blue flowers ready to bloom also!


The Amaryllis is about a foot in diameter.   It has two babies that will hopefully bloom next year.  This was just some of the plants that are welcoming the spring!

Friday, April 4, 2014

Scherenschnitte and Wycinanki

The last months I have been obsessed with cutting paper patterns.   Scherenschnitte has been like oxygen and I started cutting 3 or 4 patterns a day.  Finally I went looking for advanced patterns and ended up at a website called www.papercuttingsbyalison.com/   It was hard to choose from the many patterns offered but finally I purchased "Sheer Pleasure" designed by Alison Cosgrove Tanner and "Wycinanki" by Susanne R Cook-Greuter. 

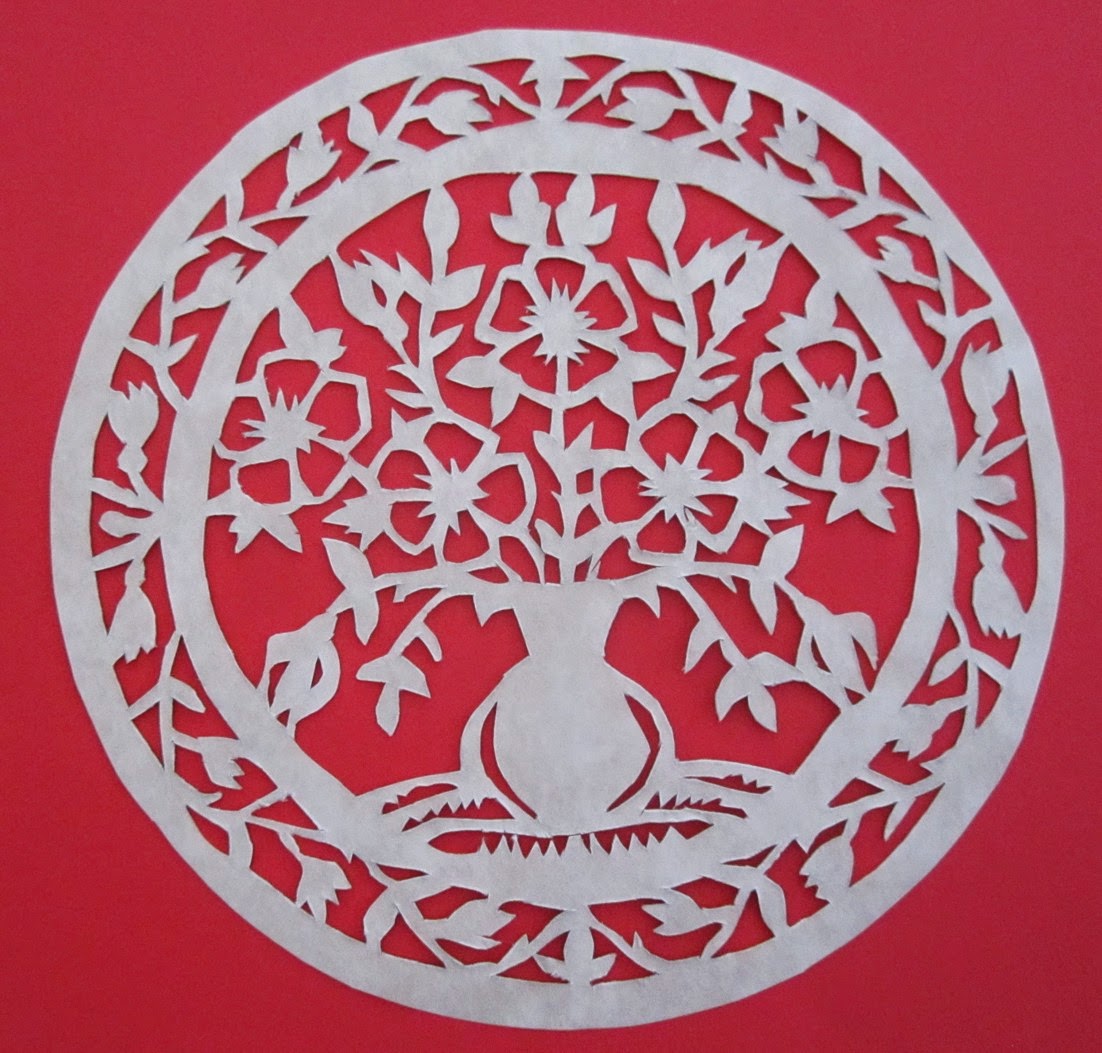
Wycinanki is the Polish term for paper cutting.  I haven't quite figured out what makes a design "Polish" but the designs tend to be brightly colored and incorporate birds especially roosters.  Also one Polish paper cutting style is to layer paper shapes slightly smaller and different colors on the design.  This form of Wycinanki is similar to some of my paper art so I look forward to trying it.  So far I have cut 84 Scherenschnitte and Wycinanki.  Some small cutting and huge cuttings but most of them fit on a 8.5 x 11 page.  Below are some of the most recent cutting I've done.

 
This is all that I could salvage from my first Wycinanki style cutting.  The vase of flowers normally sits inside a larger circle.  This is going to end up as a card decoration.

 
This was another failed attempt at a Wycinanki style cutting.  At least I was able to get through the next circle in the design.  At first I thought this was a pansy pattern but after looking at the buds realized it is a primitive rose.


This is an almost acceptable cutting.  This was a Wycinanki style cutting about 8 inches in diameter of carnations.  Unfortunately the second to the last cut left a whole in the bowl pattern.  Almost broke my heart.  This took 10 hours to cut because I stop and stretch every few cuts.

 
Center detail of carnation cutting.
 
 
Detail of outer edge.
 
 
Finally a finished piece of Wycinanki style paper cutting.  This piece was under 6 inches in diameter.  This one was a little easier because it is more dense then the other designs.  One difficulty when cutting away most of the paper is that the remaining piece can stretch and eventually tear.  Another problem I ran into was with the parchment paper.  Parchment can actually flake tearing just a layer of the paper.  Really strange!  As for the flowers I have no idea what they are but I really like the design.

 
Close up of Wycinanki style paper cutting.


This lovely heart cutting is from the patterns called "Sheer Delight" which is a Scherenschnitte pattern.  This piece is 7 x 5.5 inches which is 20% larger then the original pattern.  When starting a cutting that is difficult I find enlarging the pattern helpful.  This allows me to determine the most difficult parts of a pattern which is not always obvious.  I had to cut this enlarged pattern 3 times before I cut it properly.

 
Close up of heart cutting.  The flowers surrounding the swans were not the most difficult cuts.  If you look under the swans the lace v is actually a series of tiny swans.  The hidden animals and flowers that make up the lacy designs in Scherenschnitte is what I love about this cutting style.  It reminds me of a kaleidoscopic image.

 
Design 4.25 x 5.5 inches.
 
Finally I cut the pattern without enlargements and it came out beautifully.  Only one flower lost a petal other wise it was a great cutting.  Unfortunately a piece of paper got under the sun while I was taking pictures.  The piece is really finished.

 
Close up of heart.

 
Design 8 x 9 inches.
 
Paper cutting number 83.  This piece was a real challenge.  It was too large to increase to practice but it still took only 3 tries.  Unfortunately this cut tore twice but was repairable.  This lace cutting is so light it can barely be felt in my hand.  The design is made up of tulips in the center, dividing the image into quarters.  Around the center are geese.  Four trees grow from the center and leafy branches spread out adding to the lacy effect.  At the top of each tree is a sun or moons.  Between the trees are birds with ribbons draped with dangling hearts.  When I first saw this pattern I didn't think I would ever be able to make it.  But somehow I managed to make this elaborate cutting and move up to advanced cutting in less then 3 months.
 
 
Close up of center.

 
Close up of 1 quarter of the design.