Thursday, May 31, 2012

Paper Flower Tutorial


Close-up of bouquet.


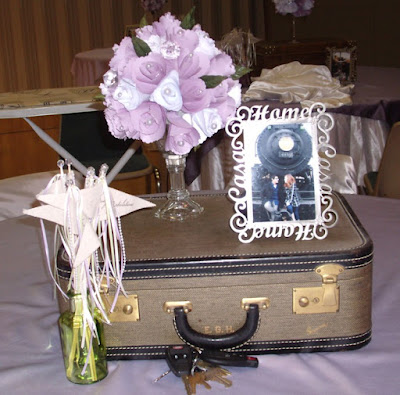
Finished bouquet.


Enough time has passed that I can now tell how we made 900 paper flowers for my nieces wedding reception. 

My sister's first child gave her mom 3 weeks to plan and execute a wedding for 300 guests.  Her first son gave her 3 hours to get dressed and to the radio station to see him married.  Her second son gave her a 3 year warning.  So it shouldn't come as a surprise that the bride in the above picture gave her mom a 3 month deadline!  Three months and only 200 guests would be easy.  My sister has helped with many weddings and other social events and can do anything!

So they started out with a wedding without flowers.  I don't know exactly why but it does seem sad watching the flowers die afterwards and she wanted an uncommon flower, something like a windflower. Not to mention wedding flowers are expensive!   So a travel on a train theme was decided on, circa 1940s.  Then she saw a bridal bouquet made of  paper flowers.  My sister is a paper artist so this was perfect!  The  bridal bouquet above has over 100 paper flowers and is amazingly beautiful.  Next she wanted all the bridesmaids to carry smaller bouquets in light purple and white.  They started making them when it was decided to not have bridesmaids.  So why not just use them on the tables at the reception.  So suddenly hundreds of flowers needed to be created,  So we had people punching scalloped hearts fom white and light purple paper.  Others making the flowers and my sister doing it all and made the bouquets all by herself.  In the end we had 15 1/2 bouquets for the reception tables.  The flower design was created by my sister Pattie and I have her permission to create the tutorial.  I suggest you visit her blog, it is a real treat! 
http://paperplates-pjbeach.blogspot.com/

Table centerpieces at the wedding.  Travel theme included old suitcases
picture of couple with an old train, paper flower bouquet and
congratulations banners to wave as the couple leaves.

Enough rambling, now for the tutorial.

What you will need for a flower, scalloped hearts of the
same size, a thin stick or dowel and a hot glue gun.


Step 1: Punch or die-cut 10 to 12 scalloped hearts the same size.  You may want to use scrap paper first before cutting a  lot of hearts.  I used the Spellbinder's scalloped heart to cut the petals out because it has 6 heart sizes..  But if you are going to make a lot of flowers Pattie suggest a punch because it is faster.


Step 2:  Next with hot glue adhere the dowel to the side of heart.  Make sure the dowel is below the top of the heart.  As you see in the picture, you can use miscuts for the center.


Step 3: Roll the paper around the dowel and glue the shape closed.


Step 4: Glue the flower to the middle of the second heart. Always make sure that the flower is glued to the next petal slightly above the heart. 


Step 5: Roll one side of the heart loosely around the flower to the center and then the other side around that.  The reason that the flower is glued to the middle of this heart is that it forces a space around the center of the flower.  Glue the petal closed.  At this point you may need to pinch the bottom of the flower and put extra glue on the bottom to hold it in place,


Step 6:  Glue the bottom of the next heart to the flower, seam side edge into the glue.    Make sure the flower is slightly above the top of the heart.  Roll one side of the heart then the other and hot glue in place,  I put a small amount of hot glue near the edge of the heart.  Think of this like adding a tube around the center.  From the top you should see some space but not a lot.  Just like looking into a rose.  Continue telescoping the flower it is important to the look..

Step 7: Keep adding petals by gluing at the bottom of the flower and glueing it closed around the flower center.


Step 8: Eventually you will need to add two petals at a time because the width of the rose.  Just like before centering a new heart over the previous petal edge and glue at the bottom.

Step 9: You can stop at anytime, adding more petals for a larger flower.  By now it should look like a flower.  Be sure to glue the flower edges to stabilize the flower.


Finished flower.

The individual flowers look a bit strange alone.  This is because of the telescoping.  For individual flowers I would not telescope them,

Putting it together.

Pattie glued a styrfoam ball to a candlestick.  Then glued flowers to the ball keeping thr round shape.  The flower dowel needs to be cut off short because long ones will keep other flowers from being set into the styrfoam.  it is a bit tricky, perhaps Pattie will be up to making a tutorial!

I hope this was helpful.  Please let me know if the instruction are clear.  I would love to see what was made with the tutorial.

Enjoy your crafting.

Wednesday, May 30, 2012

Jewelry for the Wedding guests

For the wedding I made several necklaces.  The idea was to have something to remember the occasion.   So I made every woman in the family, who attended the wedding, a pearl necklace.  Each was different and made to go with their outfits.  Unfortunately I didn''t take pictures of the finished pieces in all of the confusion of getting the chapel decorated.  The photographers didn't take many pictures of family.  So all I have are pictures of necklaces without clasps.


For Tara I made a necklace of black crystal and cream pearls. 
Her dress was 50's style cream fabric with black polka dots. 


This was my necklace to wear with a vintage blue dress from the 1980's. 
The outfit cost $2.00 from the Thrift store where I bought the wedding dress.


This was Nichol's pearl and amethyst necklace.  I used smaller pearls so that they would be in proportion with the amethysts.  She wore a grey top and skirt to the event.

If I find better pictures I will post them.  But I think this illustrates the idea of pulling the pearl theme of the wedding together with the wedding guests.  It also shows how differently pearls can be presented using different accents.

Pearl Earrings


This project I am very proud of because it was difficult. I actually made it from a pattern in Bead and Button magazine. Sorry I can't remember which one. I was given about 100 issues of Bead and Button a few years ago and still haven't looked at them all! Last night I went through some and I liked these earrings so much I had to try making them. I usually just look at the magazines to learn techniques so I'm amazed that I made something and used the instructions! It was very hard to bend the wire which was 16 gauge and even more difficult to make them look alike.

I love making jewelry because it is the one craft that the materials seem to make themselves into lovely objects.  I have read descriptions by artists that the project made itself.  For instance sculptors saying that the image was in the marble and they were just setting it free.  In my long search to understand the difference between art and crafts, the interaction of the artist and materials seems to be the difference.  That is my opinion anyway and I do not think my jewelry is art but that it has the potential to become art.  I like doing several hobbies more than jewelry but it is more satisfying to have the interaction with the materials.


I want to thank everyone who has been looking at my blog though Craftsters and Pinterest and other sources.  Having all of you looking at my stuff is very encouraging.  It makes it so much easier to make things when others give me feedback which has helped me find a direction.

Thank You!

Tuesday, May 29, 2012

Piano Hinge Book 2

Yesterday I made the inner part of the book structure and wove it together using wooden dowels.  Today I will show how to do the covers and finish making the book.

The covers were made using scrapbooking cardstock cut to 9 inches by 11 inches, then folded to 5,5 inches by 9 inches.  Next I used the template to cut the notches into the folded end of the covers.  Using wooden dowels I wove the covers ( front and back) onto the book.

Then I had some fun with Jim Holtz die cut of a dress makers dummy and is alterations embossing set.  The covers I used were turquoise so I made the embelishments red and pink.with a few buttons added on.  I had left my covers open because I thought I might want to hand sew though the cardstock.  I suggest glueing them together when done decorating.


Front cover of book.


Back cover of book.
Now is the time to decide how the book will work.  You can set the dowels into a circle and then put them in a tall bottle cover.  Or a more traditional flat book.  For a flat book align the spine so that the pages and dowels are lined up.  Once you have it aligned use some fiber like twine or thread or even yarn to weave the dowels at the top together.  A simple weave of over under will be fine.  This needs to be tight. 

Weaving the dowels with fiber.


Cut ends of bottom of book.

Next do the same thing to the bottom dowels.  If you are going to cut the dowels even with the bottom of the book, place glue on the dowels to secure the last two or three rows of weaving.  I did this for my book but left the top dowels long as a decorative element.  Also I left the two top ends of weaving long to use as bookmarks.  Don't forget to touch up the cut dowels with paint.  It's done!  The book should be able to place in a bookshelf and be able to lay flat when open.


Finished spine of book.

Monday, May 28, 2012

Piano Hinge Book

Someone on pintrest has been posting instuctions on bookbinding which are really well done. But stupidly I didn't pin them. In any case I felt like making a book today. Bookbinding is one of the artforms that get great pleasure doing. To do traditional bookbinding takes many stages and days to do. Today I wanted to play not make a more traditional book. So I went into the office and found some Astrobright paper, I have a lot stashed because it is over 100 miles to a paperstore. I had just gotten a copy of Cover to Cover by Shereen LaPlantz, which is a fantastic book on bookbinding, So I got the instuctions to make a piano hinge book from it. The book suggests 50 piece of paper folded in half. So I chose 10 pieces of five colors, yellow, pink, red, orange and green.


Astrobright paper


Next I put them together in sets of 5 pieces of folded paper, the sets are known as signatures. The way that a piano hinge binding works is to weave the signatures together with a strong material like wood or metal. Chopsticks or corndog stitcks can make really nice books. I had some 1/8 inch dowels which is easier to use because they are flexible. So to keep with the brightness of the paper, I painted the dowels bright purple!


Painted dowels drying.
Next I created a template for cutting slits in the signatures on the fold. I roughly marked the template in about 1 inch increments. Then cut wedges on two signatues (using the template) and tried to weave them together using a dowel.

Notches cut into signatures.


Signatures being woven together with a purple dowel.


Signature open to the middle page so it is easier to weave the dowel.


The first try I had the notches to shallow. So I decided to cut deeper triangles and it was still hard to weave but I was able to do it. That is important to this kind of binding, it has to be tight to hold together, but not so tight that the dowel breaks or the paper rips. So every time you change materials you have to make a new template. When making your own books I suggest openning the signature to the middle page while weaving it makes it easier fit the dowel in the triangle while weaving. Also the notches don't have to be exact but they do need to be consistant from signature to signature. If you decided to use round dowels, turning them while pushing the dowel helps to slide them though the signatures easier. Also be aware that it is easy to damage the corners of the pages while weaving. Piano hinge books are work but they look great and are fun. After weaving the first two signatures together you then weave the third signature on top of them pulling up the triangles that were not used on signature number 2. You continue adding signatures so that the whole book holds together.


You can see how the purple dowels show up woven though the signatures.


This is as much as I was able to do today because of time, hand strength and I need to paint more dowels. Tomorrow I will post the rest of the project i.e. putting on the covers and decorating the book. Hope everyone has enjoyed a day of crafting.today.

This was not meant to be a tutorial, if you found my instuctions are incoherent here is a tutorial for making piano hinge books.
http://www.making-mini-scrapbooks.com/pianohingebook.html

Sunday, May 27, 2012

Edging for baby socks


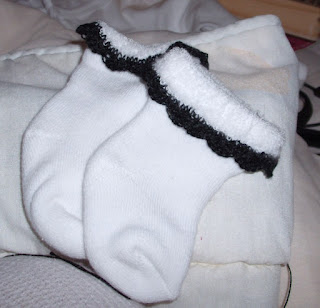
Finished baby sock edging

I love making baby things!  But somehow I never seem to finish them before the baby has grandchildren.  So I love this idea that a friend showed me, crochet edged baby socks.   All you need are a package of 0 - 3 month socks some crochet thread 10 or perl cotton size 8 and a hook about a size 4 or comfortable for the size thread.  My friend then adds plastic beads but that worries me for baby socks but they are cool looking.  So I just doodle edgings.  To make the edging make a slip knot and push the hook through the sock, yarn over and pull a loop through the sock, chain 1 and then evenly stitch single crochets around the sock.  If you slightly stretch the sock it is easier to get the hook in the sock.  Also if you look for the perl stitch and place the single crochet in each perl it is easy to get them evenly spaced.  I don't bother to count stitches.  Slip stitch into the first single crochet.  Chain 1 and then place a single crochet in the first single crochet of previous row.  Skip two single crochets and place five double crochets in the next stitch.  Skip two stitches and single crochet in the next stitch, repeat around the sock.  When there are only two or three repeats left count the stitch left and adjust your stitching.  For instants I had one extra single stitch so I skipped three stitches instead of two at the end.  Then slip stitch into the first single crochet to complete the round.  End of and run the thread ends to finish.  Place several in a basket or use to decorate a diaper cake.

Saturday, May 26, 2012

Just under the wire


It is really hard to come up with a project every day and I will just have made it under the wire today.  Went to Beverlys today but we didn't tat.  It was nice to see people and talk, watch people crocheting.  So no tatting to show tonight!  So I came home and couldn't decide on something to make.  I played with ribbons and spent time looking at books.  But finally I decided to finish a project.  The project is a scissor case.  I had embroidered the case with silk ribbon spider roses and lavender sprays from brazilian threads.  Sometimes it seems  harder to finish a project then to embroider one!  But this had been finished for some time and just needed to be made into a scissor case..  I took some pictures while I worked.


First I took the embroidered piece and placed it right sides together with the satin lining.  Then I hand sewed the two pieces together leaving room to turn it right side out.  For silk ribbon embroidery my back side looks great.  Next I trimmed the edges, angle cut the corners and turn it right side out. 


Picture of right side of case.

Next I folded the edges so it made a cone shape and I slip stitched the case together.  Below it looks like a cornucopia!


When it was sewn to the top of the seam I tied off the threads.  It came out a little  wonky because the square was a little off.


Next I sewed a cute button on the body of the case sewing from the inside to make it look a little neater.


Once the button was attached  I made a double loop out of Brazilian thread in a pale lavender.  I attached the loops to the top point of the case and woven the thread over and under to make a sturdy loop to close the case.  I also made a small tassel for the bottom.


Loops before weaving.


Back of case.


Finished closed front of case.


Back of finished closed case.

 
It isn't good enough for a gift so it is a good thing I don't have a scissor case!

I hope that someone will find this helpful. This type of case can be very pretty and makes great gift for embroiders. 

Friday, May 25, 2012

Tatting with shuttles

Today was not the most productive day!  My hands still feel bruised and tired from wire wrapping. Tomorrow is Tatting day over at our local Bevely's.  So I spent time watching the tatting disc from the book, Learn to Tat by Janette Baker.  It is a great book to learn shuttle tatting.  If you want to learn needle tatting I reccomend,  Learn Needle Tatting Step by step, by Barbara Foster.  Today was a good review plus I practised using two shuttles.   Here is a couple of pictures of what I made. 


This is the first tatted butterfly Ive made in more than 20 years.


This is a sample done with two shuttles.

It will be fun having others to tat with tomorrow.  Just hope I can keep up with everyone there.  Tatting is easy to learn with a good book and can actually be relaxing!

Thursday, May 24, 2012

One of those days!

Please forgive my ramblings today, not enough oxygen to the brain and I can barely see the computer screen.  After posting yesterday I started looking around for my next project to post.  This Saturday there is going to be a bunch of us tatting at the Santa Maria Beverly's Craftstore.  So I thought it would be great if I got out the doily I was making and finish it for Saturday.  Well I gave up because I couldn't find it anywhere.  So then I decided to embroider some opera length black gloves with some silk ribbon roses and some stumpwork leaves.  But I couldn't find any of my huge stash of silk ribbons!  So frustrated I made another necklace.  I started with silver findings and cream crystal pearls and a large diamond shaped metal piece as the main focus.  What I ended up with was a necklace with gold findings 3mm black and red crystals and a black crystal donut!


I liked how the red and black crystals showed up between the pearls but I don't like the donut.  So the project needs some rethinking when my brain starts working again.  Later on in the evening I was looking up an obscure type of embroidery and came up with this link to a beautiful piece of wirework jewelry http://www.flickr.com/photos/gypsymoonartstudio/4853400500/in/faves-ederajewelry/
Even though it was late I got out some 16 gauge copper wire and started to make my own version.


It is not nearly as nice as the above link, but to my credit it is handworked.  I don't use a wire tool like a Whirly gig.  But after looking at the first piece I am inspired to get a wire wrapping tool and creating my own wirework designs.  My hands are still screaming at me! 

While looking for some yarn I did find the tatted doily.  Perhaps I will wok on that today!


Wednesday, May 23, 2012

Marcasite look necklace

Marcascite is very lovely but very expensive.  So I purchased these links and the set crystals on them to simulate marcacite.  The necklace came out lovely it was a bit of work getting the beading wire spaced enough to use crimp covers.  It took several tries but it is finally done except I ran out of crystals and need to get 10 to finish.  Now to think of something to make tomorrow!


Marcacite look necklace.


Close-up of links.

Tuesday, May 22, 2012

Copper Watch

Today's project was a copper watch.  I've had the watch a couple years now and finally got around to making it.  At first I wanted to use a combination of copper and green opal beads for the band.   Here is an example of green opal.  Green opal is a kind of Chaledony and reminds me of the green patina of copper.


But in the last order the stones were very dark and I didn't like the way it was turning out so I just went with tiny copper beads.  They were so small it took some time to string them.  The band is 7 inches and has an S-clasp.

Copper beaded watch band.

Watch face

It came out very lovely.  I find stringing beads difficult so I am very happy with the results.

I also took the small beaded purse to the Beverly's craftstore in Santa Maria.  So I finished the challenge.  Now to see if they like it.  Hope everyone gets a chance to make something today.

Monday, May 21, 2012

Another Day Another Project


I've taken on a personal challenge to make something everyday!  A difficult endeavor at the best of times.  So far I've done well on the challenge.  Today I'm posting pictures of a green crystal necklace with copper beads.  The chain was already a necklace.  I just cut the chain and wired in the beads using 20 gauge copper.  The bottom piece is 16 gauge copper wire that I strung with crystal and copper beads and copper bead caps.  Then I wire wrapped the ends onto the chain.  Then curved the wire to round the bottom.  The 16 gauge keeps the shape and makes it rather fun.  The necklace is really beautiful.