Showing posts with label paper cutting. Show all posts

Friday, June 3, 2016

Christmas Scherenschnitte

With the county fair coming up I am getting together the projects to enter.  Below is a Christmas Nativity cutting I did last year.  The cutting came out really well but was a bit hard to cut.  I bought it from http://digital.papercuttingsbyalison.com/category.cfm?cat=23 The site now has downloadable patterns and it features some really nice Christmas designs.  I really love that it is so lacy and has so much detail.  At first glance it can be hard to see that the pattern has all the elements of the nativity.  I think this will be one of my entries this year once I get it framed.  


Nativity scherenschnitte.


Nativity scherenschnitte close up.

Friday, April 4, 2014

Scherenschnitte and Wycinanki

The last months I have been obsessed with cutting paper patterns.   Scherenschnitte has been like oxygen and I started cutting 3 or 4 patterns a day.  Finally I went looking for advanced patterns and ended up at a website called www.papercuttingsbyalison.com/   It was hard to choose from the many patterns offered but finally I purchased "Sheer Pleasure" designed by Alison Cosgrove Tanner and "Wycinanki" by Susanne R Cook-Greuter. 

Wycinanki is the Polish term for paper cutting.  I haven't quite figured out what makes a design "Polish" but the designs tend to be brightly colored and incorporate birds especially roosters.  Also one Polish paper cutting style is to layer paper shapes slightly smaller and different colors on the design.  This form of Wycinanki is similar to some of my paper art so I look forward to trying it.  So far I have cut 84 Scherenschnitte and Wycinanki.  Some small cutting and huge cuttings but most of them fit on a 8.5 x 11 page.  Below are some of the most recent cutting I've done.

 
This is all that I could salvage from my first Wycinanki style cutting.  The vase of flowers normally sits inside a larger circle.  This is going to end up as a card decoration.

 
This was another failed attempt at a Wycinanki style cutting.  At least I was able to get through the next circle in the design.  At first I thought this was a pansy pattern but after looking at the buds realized it is a primitive rose.


This is an almost acceptable cutting.  This was a Wycinanki style cutting about 8 inches in diameter of carnations.  Unfortunately the second to the last cut left a whole in the bowl pattern.  Almost broke my heart.  This took 10 hours to cut because I stop and stretch every few cuts.

 
Center detail of carnation cutting.
 
 
Detail of outer edge.
 
 
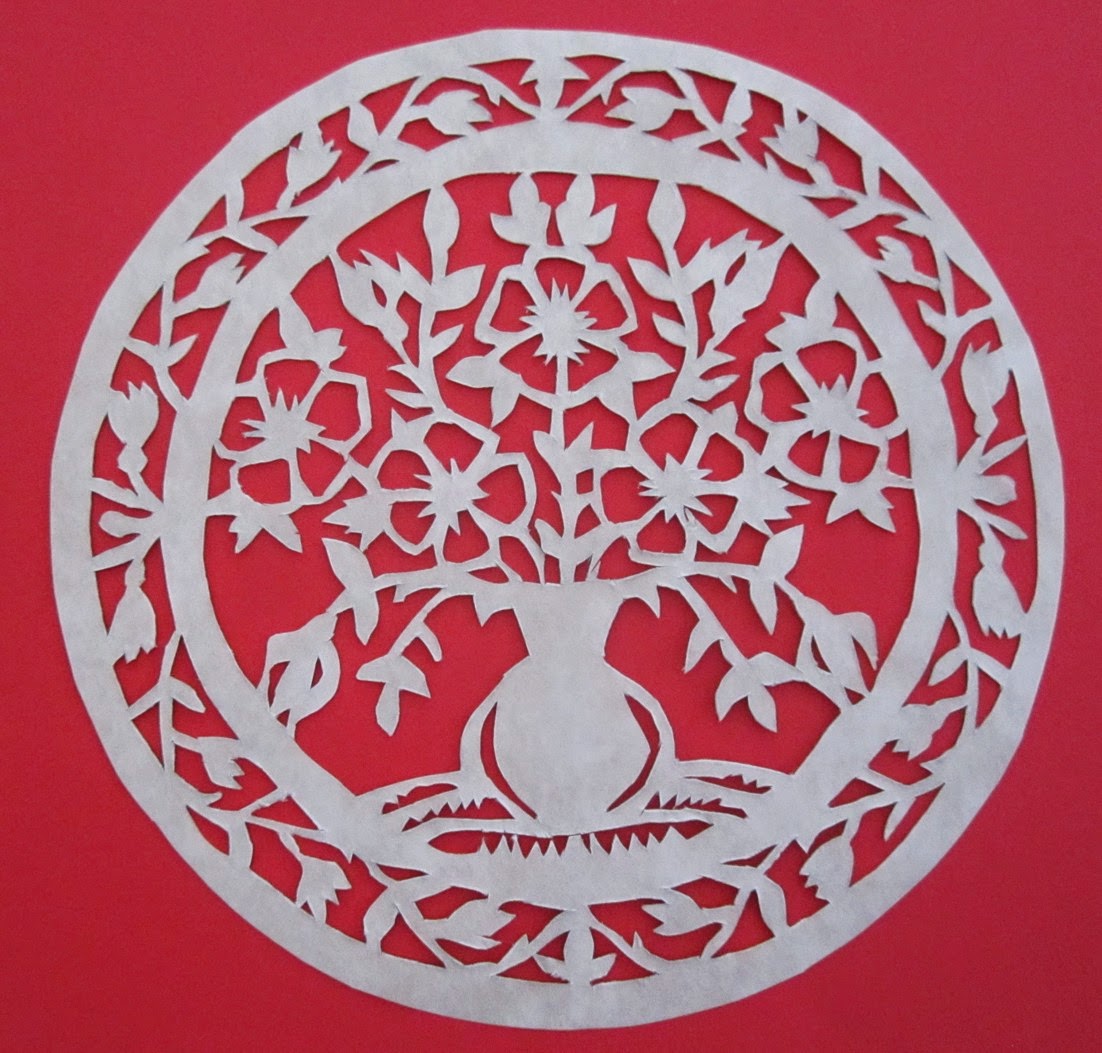
Finally a finished piece of Wycinanki style paper cutting.  This piece was under 6 inches in diameter.  This one was a little easier because it is more dense then the other designs.  One difficulty when cutting away most of the paper is that the remaining piece can stretch and eventually tear.  Another problem I ran into was with the parchment paper.  Parchment can actually flake tearing just a layer of the paper.  Really strange!  As for the flowers I have no idea what they are but I really like the design.

 
Close up of Wycinanki style paper cutting.


This lovely heart cutting is from the patterns called "Sheer Delight" which is a Scherenschnitte pattern.  This piece is 7 x 5.5 inches which is 20% larger then the original pattern.  When starting a cutting that is difficult I find enlarging the pattern helpful.  This allows me to determine the most difficult parts of a pattern which is not always obvious.  I had to cut this enlarged pattern 3 times before I cut it properly.

 
Close up of heart cutting.  The flowers surrounding the swans were not the most difficult cuts.  If you look under the swans the lace v is actually a series of tiny swans.  The hidden animals and flowers that make up the lacy designs in Scherenschnitte is what I love about this cutting style.  It reminds me of a kaleidoscopic image.

 
Design 4.25 x 5.5 inches.
 
Finally I cut the pattern without enlargements and it came out beautifully.  Only one flower lost a petal other wise it was a great cutting.  Unfortunately a piece of paper got under the sun while I was taking pictures.  The piece is really finished.

 
Close up of heart.

 
Design 8 x 9 inches.
 
Paper cutting number 83.  This piece was a real challenge.  It was too large to increase to practice but it still took only 3 tries.  Unfortunately this cut tore twice but was repairable.  This lace cutting is so light it can barely be felt in my hand.  The design is made up of tulips in the center, dividing the image into quarters.  Around the center are geese.  Four trees grow from the center and leafy branches spread out adding to the lacy effect.  At the top of each tree is a sun or moons.  Between the trees are birds with ribbons draped with dangling hearts.  When I first saw this pattern I didn't think I would ever be able to make it.  But somehow I managed to make this elaborate cutting and move up to advanced cutting in less then 3 months.
 
 
Close up of center.

 
Close up of 1 quarter of the design.
 

Wednesday, January 22, 2014

Scherenschnitte and Pergamano

Yesterday I was looking through a pad of paper when I found a scherenschnitte piece I had cut several days earlier and put in the pad to flatten.  This pattern was also from a magazine and was suggested as a wedding gift.  Unfortunately the birds were damaged while I was cutting them out.  Still the rest came out very well.


In some ways I suppose that the combination of Scherenschnitte and Pergamano just doesn't sound right, but that never stopped me before!  In fact I was surprised the other day when I went looking for pergamano supplies at http://www.ecstasycrafts.com/  All I can say is WOW!  They offer so many interesting supplies that anyone doing paper art will find something there.  But then I got to thinking that with so many different tools pergamano is a lot easier then when I started learning it 15 years ago.  Since I have been learning lace making it was only natural that making paper lace would become yet another hobby.  Unfortunately pergamano was beyond my skills.  I found that embossing the parchment was extremely difficult, just pressing down on the paper a little too much will cause a tear.  Pergamano can be a very frustrating hobby.  Finally I ran out of the special parchment and couldn't get anymore.  I do still have some heavy vellum card inserts for invitations.  So when I wanted to do pergamano I could, as long as the project was small.  After trying scherenschnitte with some success I decided to try a small pergamano project.  So I got out "Parchment Craft" by Martha Ospina and the vellum inserts and looked for an easy project.  The book "Parchment Craft" is a good book for learning pergamano and all of the gallery pieces have patterns, which is really great.  So looking through the book for something easy to make I found a fan pattern.  Without actual instructions I had to make some guesses on how to put the fan together.  But at least the fan pieces were marked clearly as to what tools to use.  The four needle tool gave me some problems, I had trouble lining up the tool so some of them were a bit crooked.  Not knowing how many piece were needed for the fan I started with 12.  For every good fan piece I made one was ruined.  After several hours I finally had 12 pieces and put them together using a brad.
 
 
Fan pieces being added to a brad.

 
Close-up of pergamano fan pieces.
 
 
Fan pieces.

 
A different angle.
 
The fan is not completed yet but it is a good start.  The fan was good practice for me and the embossing is getting easier to do.  I believe another six pieces should fill out the fan nicely.  There was a lot of trouble with getting the pieces aligned, it took me over an hour!  I thought that each piece would fit together but no such luck.  So I went back to the book and after staring at the gallery image I realized that thread was wrapped around each piece in a back stitch!  So the fan is permanently forced open!  The gallery image was also colored so I am thinking of doing that before finishing the fan.  So there is still a lot to do to finish this practice project.  Once I've practiced some more I hope to design a Scherenschnitte, pergamano and paper embroidery piece.

Monday, January 20, 2014

Dimensional Note Cards

This week continued the paper arts that I have been doing since getting some new paper art books.  A trip out for supplies found a new toy, a stencil cutter.  The stencil cutter is just an Exacto knife inside a padded pen casing.  The tool is very easy to use and has given me added ability in doing Scherenschnitte.  With new confidence I cut what I thought was an easy pattern, it turned out to be quite difficult because it had curlicues and was quite curvy.  The new knife worked quite well but I broke the tip of the blade and by the end of the project it was really rough.  But the project was good practice.  After cutting the image out I then colored it which covered over a lot of flaws.  Here is my latest Scherenschnitte.

 
Halloween Scherenschnitte.
 
Not a very good job but I did enjoy the project.  The leaves were a lot more difficult than I thought they would be, I only used a knife on this project.
 
Most of the time I spent crafting last week was making some 3D cards for the EGA Birthday gift.  Everyone needs a note card now and then!  So I picked out a series of floral clip art and sized it to fit on a 4x5 inch card.  The cards were made of plain white cardstock that I cut and then embossed using a Cuttlebug.  The cardstock I used was rather thin and because I embossed both sides I needed to add a piece of paper inside to stabilize and give a smooth surface to write on.  I decided to use a pink marbled paper inside the cards and made envelops to match.  Then I printed several copies of clipart and cut the images into levels.  Starting with the entire image I made a foundation.  Then I decided what I wanted as a second level, usually an image without the background.  Then I chose parts of the image for the third level to cut out.  Finally cutting a fourth level for more complex images such as the daffodils.
 
 
Daffodil note card,
 
 
The hat quilt and chair arm have added layers.
 
 
To the right is a matching sticker to close the envelope. 
The bug was cut out to add a little dimension besides that of the flower.

 
A white daffodil card. 
 
This shows how the trumpet is a separate layer,  To get the dimensional look the trumpet is attached with foam tape. 
 
 
A bunch of small daffodils.
 
 
Foxglove card.
 
The top of these flowers had to be anchored with white glue to ensure that they would not be damaged by the envelope.  Usually I don't secure elements with glue but the flower tops were so small that I couldn't use the foam tape.  By making a layer out of the forward leaves this piece had a more dimensional look.
 
 
One of my favorites. 
 
The tulip stems were secured with glue and then the flower pot added as a layer.  The bird in the top most layer adds to the dimensional feeling of the card.
 
 
Watering can with hollyhocks. 
 
The small bug was left over from the other cards so I added it here.
 
 
Finished card package.
 
Finally I punched some paper lace and wrapped the cards together.  This project took a lot of time because even with making extras at each step I had accidents and had to repeat each step of the process.  I even lost a card after finishing.  Maybe some day I will make some cards for myself but they are too much work!


Monday, January 13, 2014

More Scherenschnitte

The last few days I have been going through a ton of magazines looking for Scherenschnitte patterns.  Every Christmas and Valentines Day the magazines publish patterns.  So I knew that I had a few patterns but found more than I thought were to be gleaned.  Most were simple cuttings and I found some really nice Valentines patterns. 

 
From the book "Papercutting" by Claudia Hopp.
 
 
Also from the book "Papercutting" by Claudia Hopp.
 
 
Another cutting from the book "Papercutting" by Claudia Hopp.
 
 
Valentine cutting.  A set of four patterns found in a magazine.  
 
This was a very easy cutting because all the detail is on the edges of the heart.
 
 
This Valentine cutting was difficult because the tulips kept moving and one got cut off.  It is very beautiful and I intend to keep trying to make it.
 
 
A Valentine cutting with hearts and tulips.
 
This was an extremely easy pattern.
 
 
A Christmas cutting, reindeer and a tree. 
 
This cutting uses three or four images and then glued together to make a 3D ornament.
 
 
Lazy day.
 
This was challenging to cut because of all the details.  I had to cheat to cut out the hat band by cutting through the whole piece.  The knives I had were not cooperating.  Currently I am working on a wedding cutting but it wants to make trouble.  This has been a fun experience and I am glad I was able to find so many patterns.  Now to look through other sources such as lace patterns and cross stitch!


Tuesday, January 7, 2014

Waiting for Books

Today I was waiting for the UPS driver to bring the wonderful paper cutting books that I ordered.  Last year I was very naughty and swapped a lot of books through www.paperbackswap.com , the idea was to find good homes for my crafting books.  Unfortunately I asked for more books then I traded away!  So now I have more than 20 books more then traded.  Still it could be worse, though I now have over 100 books on embroidery and lace making alone.

The book "Creative Paper Cutting, Fifteen Paper Sculptures to Inspire and Delight" is a lovely book.  The projects are quite different from the Scherenschnitte paper cutting.  Instead
Creative Paper Cutting" gives a variety of sculpted paper projects. Having read the book using the Amazon "Look Inside" feature, I immediately went to the projects.  But instead of starting on the first and easiest project I jumped to project 10.  The 10th project is a sculpture of a beetle and very detailed.  Instead of laying the pattern on cardboard and cutting the pieces out I just printed the images directly by copying onto the card stock.  This didn't work because the card stock was to soft to emboss and it was hard to cut all the printed lines so that they didn't show.  The project also called for white tissue paper which I do not have.  It was a sad looking beetle especially since I lost one of it's wings!  Not a very promising start!  Next time I will take advice from the book on cutting and embossing.

The last few days all the projects I have tried have not come out well.  This last weekend I worked on learning the flat 10 strand Kumihimo braid worked on the square foam board.  The practice strand out well only a few wobbles.  Then I cut 10 pieces of size 10 crochet cotton and strung each thread with 50 size 8 seed beads.  The strand started well but when I started adding the beads it failed.  From what I can see the project needed a thicker thread or smaller beads.  The project just couldn't keep the beads in place.  Also the glass beads wore the cotton thread badly.  Lesson learned!  Still I hope to make a necklace using the Kumihimo technique.  Tomorrow I hope to make the hummingbird project, it was this project that inspired me to buy the book.

Wednesday, January 1, 2014

Happy New Year!

Lately I haven't been posting because my laptop went to sleep and will not wake up.  Using my desktop was too difficult because I couldn't sit without pain using it.  So Lee got me a wireless keyboard and mouse and I can now blog from bed using the TV as my screen.   It is going to take some time to get used to this new configuration.

To start the New Year I thought I would post some scans of the 3D Christmas cards I sent out.  I haven't finish sending them all and there is a slight chance of cookies and truffles to be sent too.  Most of the images used are by Laurie Furnell,  she currently sells clip art on www.etsy.com  The way I made the cards was to print out three or more copies of the images.  Next I cut out parts of the image I want to popup and used foam tape to make layers on top of the original images.


This little penguin has several layers.  The penguins hat and beak are layered.  The tree and arm are layered and then the arm is layered on top so it looks like the penguin is holding the tree.  The penguin came out very cute.  Here are some of the other cards I made.


I added real buttons to the corners for fun!

 
One of my favorite cards.


This image has a lot of layers.  I even cut out the roof snow and layered it.  The windows are layered as are the wreaths and poles.
 
 
The cake in the window is layered and even the gingerbread on the sign pops up.  It is hard to cut the smaller images but most of these just took patience and good scissors.


Another of my favorites.  I did all of the buildings in this clipart collection.

I was so happy cutting out all these cards that I decided to learn more about paper cutting.  I ordered two new books from Amazon.

http://www.amazon.com/gp/product/1861089201/ref=oh_details_o00_s00_i00?ie=UTF8&psc=1

http://www.amazon.com/gp/product/0811708195/ref=oh_details_o00_s00_i02?ie=UTF8&psc=1

Both of these books have a very good "look inside" features.  The first book has an incredible hummingbird pattern!

Well I hope that all of you have a Happy New Year and get a lot of time to craft in the coming year!