Showing posts with label paper. Show all posts

Saturday, February 15, 2014

Happy Cheap Chocolate Day!

We don't celebrate Valentine's Day around here, instead my boyfriend buys me some chocolate the day after.  We never have had a lot of money so "Cheap Chocolate Day has become our tradition.  This year though I wanted to make some Valentine's to give to friends and make a "How To" that didn't happen.  Since my last post I have done almost nothing but scherenschnitte.  This new hobby has become something of an obsession and I have gone through more than 15 blades this week and have ordered another book.  I also found a wonderful paper cutting site https://www.papercuttingsbyalison.com/index.cfm   This site is called cuttings by Alison and has a huge selection of patterns.  After some more practice I may order some advanced patterns but for now I have a book of 275 patterns to look forward too.  All this practice has paid off and now I consider myself at the intermediate stage of scherenschnitte.  So instead of finished Valentines I have some pretty cuttings, I hope that these cuttings will inspire others to keep this tradition alive.

 
This pattern was from a book of embroidery designs from the 19th century.
 
 
Some easy hearts!


Three more elaborate hearts.
 
 
Cutting of a unicorn.
 
 
This heart was very difficult this was my second try.
 
 
This was my first try at this heart pattern then I painted it with water colors.
Painting can hide many mistakes!
 
 
Here is a kitten cutting that I am still working on.  It will make a nice card.
 
 
Here is a large cutting I did even with reducing it's size it still took up a 11 x 17 paper.
 It is meant to be a family tree, unfortunately the two center birds fell off it.
 
 
This piece is a 8.5 x 11 cutting for a birth or marriage certificate.
 
 
Finally another 8.5 x 11 certificate.  I cut this without a finished image
and was happily surprised by the angel on top of the heart.
 
These are not the only cutting that I made in the last couple of weeks.  The other cuttings were for Halloween so I may post them later.  Now I am working on Easter patterns, here is a preview!
 
 
Two cute little bunnies!
 
So what ever holiday you prefer I hope it was a happy one!

Wednesday, January 22, 2014

Scherenschnitte and Pergamano

Yesterday I was looking through a pad of paper when I found a scherenschnitte piece I had cut several days earlier and put in the pad to flatten.  This pattern was also from a magazine and was suggested as a wedding gift.  Unfortunately the birds were damaged while I was cutting them out.  Still the rest came out very well.


In some ways I suppose that the combination of Scherenschnitte and Pergamano just doesn't sound right, but that never stopped me before!  In fact I was surprised the other day when I went looking for pergamano supplies at http://www.ecstasycrafts.com/  All I can say is WOW!  They offer so many interesting supplies that anyone doing paper art will find something there.  But then I got to thinking that with so many different tools pergamano is a lot easier then when I started learning it 15 years ago.  Since I have been learning lace making it was only natural that making paper lace would become yet another hobby.  Unfortunately pergamano was beyond my skills.  I found that embossing the parchment was extremely difficult, just pressing down on the paper a little too much will cause a tear.  Pergamano can be a very frustrating hobby.  Finally I ran out of the special parchment and couldn't get anymore.  I do still have some heavy vellum card inserts for invitations.  So when I wanted to do pergamano I could, as long as the project was small.  After trying scherenschnitte with some success I decided to try a small pergamano project.  So I got out "Parchment Craft" by Martha Ospina and the vellum inserts and looked for an easy project.  The book "Parchment Craft" is a good book for learning pergamano and all of the gallery pieces have patterns, which is really great.  So looking through the book for something easy to make I found a fan pattern.  Without actual instructions I had to make some guesses on how to put the fan together.  But at least the fan pieces were marked clearly as to what tools to use.  The four needle tool gave me some problems, I had trouble lining up the tool so some of them were a bit crooked.  Not knowing how many piece were needed for the fan I started with 12.  For every good fan piece I made one was ruined.  After several hours I finally had 12 pieces and put them together using a brad.
 
 
Fan pieces being added to a brad.

 
Close-up of pergamano fan pieces.
 
 
Fan pieces.

 
A different angle.
 
The fan is not completed yet but it is a good start.  The fan was good practice for me and the embossing is getting easier to do.  I believe another six pieces should fill out the fan nicely.  There was a lot of trouble with getting the pieces aligned, it took me over an hour!  I thought that each piece would fit together but no such luck.  So I went back to the book and after staring at the gallery image I realized that thread was wrapped around each piece in a back stitch!  So the fan is permanently forced open!  The gallery image was also colored so I am thinking of doing that before finishing the fan.  So there is still a lot to do to finish this practice project.  Once I've practiced some more I hope to design a Scherenschnitte, pergamano and paper embroidery piece.

Monday, January 20, 2014

Dimensional Note Cards

This week continued the paper arts that I have been doing since getting some new paper art books.  A trip out for supplies found a new toy, a stencil cutter.  The stencil cutter is just an Exacto knife inside a padded pen casing.  The tool is very easy to use and has given me added ability in doing Scherenschnitte.  With new confidence I cut what I thought was an easy pattern, it turned out to be quite difficult because it had curlicues and was quite curvy.  The new knife worked quite well but I broke the tip of the blade and by the end of the project it was really rough.  But the project was good practice.  After cutting the image out I then colored it which covered over a lot of flaws.  Here is my latest Scherenschnitte.

 
Halloween Scherenschnitte.
 
Not a very good job but I did enjoy the project.  The leaves were a lot more difficult than I thought they would be, I only used a knife on this project.
 
Most of the time I spent crafting last week was making some 3D cards for the EGA Birthday gift.  Everyone needs a note card now and then!  So I picked out a series of floral clip art and sized it to fit on a 4x5 inch card.  The cards were made of plain white cardstock that I cut and then embossed using a Cuttlebug.  The cardstock I used was rather thin and because I embossed both sides I needed to add a piece of paper inside to stabilize and give a smooth surface to write on.  I decided to use a pink marbled paper inside the cards and made envelops to match.  Then I printed several copies of clipart and cut the images into levels.  Starting with the entire image I made a foundation.  Then I decided what I wanted as a second level, usually an image without the background.  Then I chose parts of the image for the third level to cut out.  Finally cutting a fourth level for more complex images such as the daffodils.
 
 
Daffodil note card,
 
 
The hat quilt and chair arm have added layers.
 
 
To the right is a matching sticker to close the envelope. 
The bug was cut out to add a little dimension besides that of the flower.

 
A white daffodil card. 
 
This shows how the trumpet is a separate layer,  To get the dimensional look the trumpet is attached with foam tape. 
 
 
A bunch of small daffodils.
 
 
Foxglove card.
 
The top of these flowers had to be anchored with white glue to ensure that they would not be damaged by the envelope.  Usually I don't secure elements with glue but the flower tops were so small that I couldn't use the foam tape.  By making a layer out of the forward leaves this piece had a more dimensional look.
 
 
One of my favorites. 
 
The tulip stems were secured with glue and then the flower pot added as a layer.  The bird in the top most layer adds to the dimensional feeling of the card.
 
 
Watering can with hollyhocks. 
 
The small bug was left over from the other cards so I added it here.
 
 
Finished card package.
 
Finally I punched some paper lace and wrapped the cards together.  This project took a lot of time because even with making extras at each step I had accidents and had to repeat each step of the process.  I even lost a card after finishing.  Maybe some day I will make some cards for myself but they are too much work!


Wednesday, January 1, 2014

Happy New Year!

Lately I haven't been posting because my laptop went to sleep and will not wake up.  Using my desktop was too difficult because I couldn't sit without pain using it.  So Lee got me a wireless keyboard and mouse and I can now blog from bed using the TV as my screen.   It is going to take some time to get used to this new configuration.

To start the New Year I thought I would post some scans of the 3D Christmas cards I sent out.  I haven't finish sending them all and there is a slight chance of cookies and truffles to be sent too.  Most of the images used are by Laurie Furnell,  she currently sells clip art on www.etsy.com  The way I made the cards was to print out three or more copies of the images.  Next I cut out parts of the image I want to popup and used foam tape to make layers on top of the original images.


This little penguin has several layers.  The penguins hat and beak are layered.  The tree and arm are layered and then the arm is layered on top so it looks like the penguin is holding the tree.  The penguin came out very cute.  Here are some of the other cards I made.


I added real buttons to the corners for fun!

 
One of my favorite cards.


This image has a lot of layers.  I even cut out the roof snow and layered it.  The windows are layered as are the wreaths and poles.
 
 
The cake in the window is layered and even the gingerbread on the sign pops up.  It is hard to cut the smaller images but most of these just took patience and good scissors.


Another of my favorites.  I did all of the buildings in this clipart collection.

I was so happy cutting out all these cards that I decided to learn more about paper cutting.  I ordered two new books from Amazon.

http://www.amazon.com/gp/product/1861089201/ref=oh_details_o00_s00_i00?ie=UTF8&psc=1

http://www.amazon.com/gp/product/0811708195/ref=oh_details_o00_s00_i02?ie=UTF8&psc=1

Both of these books have a very good "look inside" features.  The first book has an incredible hummingbird pattern!

Well I hope that all of you have a Happy New Year and get a lot of time to craft in the coming year!

Friday, November 22, 2013

Asian Style Tree for Altrusa Festival of Trees

Now that Marie is out of the way it is time to finish up the Asian Style Tree.  Wouldn't it have been nice to have them more than a week apart!  I failed to finish the cupcakes, I had made 18 not counting rejects, but didn't get them all decorated.  So I have a ton of cupcakes with no idea what to do with them!

So this week I am trying to get something accomplished for the Asia style tree.  Everyone liked the iris folded ornaments so I have been concentrating on making more of them.  I bought some wonderful origami paper unfortunately it was a bit expensive.  It was tricky but I squeezed out two ornaments with the origami paper, a fan and another kimono.  The iris folding patterns were from the book "Iris Folding, Spiral Folding for Paper Arts" by Design Originals.  This is a great pamphlet style book and comes with patterned paper inside.  I have a couple more of their books and treasure them all.

 
Iris folded origami paper fan.
 
Sadly the fan ornament had a flaw in the design.  All the layers of paper end at the same point at the bottom of the fan.  This made the fans extremely bulky.  So I cheated!  I only folded the papers slightly instead of in half, reducing the bulk.  Then once the fan was done I carefully cut away some more of the excess paper at the point.  That was scary, but I didn't hurt the layering.  Even with all of the cheating the fan was still too thick at the point.  So then I had a great bit of inspiration and put it in an embossing folder and ran it through a Cuttlebug!  The embossing enhanced the design greatly and squished it a lot flatter.  It was tricky adjusting plates so that such a fat project would go through and in the end I had to scrim it.  Then I ran the cardboard backing for the fan through the machine.  Next added a tassel and hanging thread and hot glued it all together.  I also ran the kimono ornament through the Cuttlebug to make it look richer with the embossing.
 
 
Iris folded origami kimono.
 
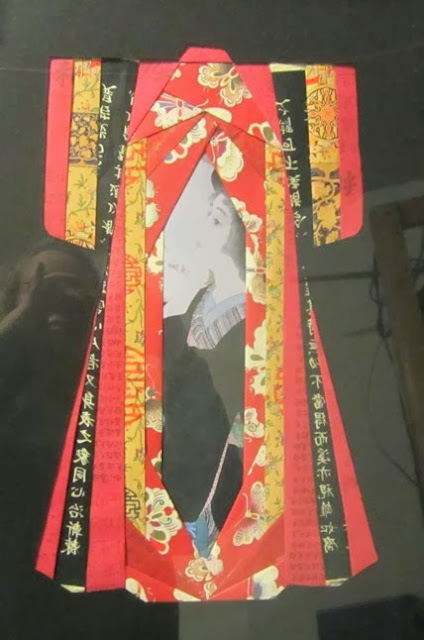
Yesterday I worked on a framed piece inspired by the kimono pattern.  A kind person gave Lee a beautiful 16" x 20" frame.  From the moment I saw the frame I knew that it was going to be part of the Asian style tree.  Along with the tree ornaments we also needed to add gifts and so this would be my gift contribution.  So I enlarged the kimono pattern and then cut it out of a 16" x 20" piece of black mat board.  Then I took several handmade papers and some gift wrap and made a larger version of the kimono.  It isn't finished yet, I am still thinking of changing the image in the center.  The image in the framed kimono is a little too blue.
 
 
Framed iris folded kimono.
 
So far only five ornaments are finished.  My hope is to make more of the teapots today, since I already bought fabric for the project.  Maybe I will be able to make a tutorial on the teapots.  It has been a long time since I did a tutorial.  Only two days to finish up and I still haven't made up a necklace for another tree gift.  Got to get back to work!

Wednesday, October 9, 2013

Another Ornament for the Asian Style Tree for Altrusa

 
Three sided paper ornament.


Last evening I made another ornament for the Asian Style Altrusa tree.  First I started by printing out 3 images onto high gloss photo paper.  Then cut six 4 inch circles, using a Fiskar circle template, out of a shimmery silver paper.  The paper was strong and flexible like a thick vellum.  Next I centered the printed images using the 3.5 inch circle template.  Because the pencil marks kept smudging on the image I used the top of a crochet hook to mark the cutting line.  Then with the six silver circles and the images cut out I started to glue.  First I took the images and glued them to three of the silver circle.  Using the plain silver circles I glued half of circle A to circle B, then glued the second half of circle B to circle C.  Next I glued in the center a doubled silver thread to create a hanger and leaving enough thread at the bottom of the ornament to tie a tassel to.  Finish by gluing the leftover half of circle A to the last half of circle C.  Here is the ornament looking through the top.

 
The silver circles glued together form the inside section.  The image circles form the outside.
 

Next using the silver circles with the images I glued them to the silver center at the center edge.  This created the outer part of the ornament.  This left a space behind the image circle.  Finally I made a tassel from the silver thread and added it to the bottom of the ornament.  Here is the finished ornament showing the three sides.  Very simple and lovely.  This would be great for a first Christmas or other family pictures.