Friday, November 22, 2013

Asian Style Tree for Altrusa Festival of Trees

Now that Marie is out of the way it is time to finish up the Asian Style Tree.  Wouldn't it have been nice to have them more than a week apart!  I failed to finish the cupcakes, I had made 18 not counting rejects, but didn't get them all decorated.  So I have a ton of cupcakes with no idea what to do with them!

So this week I am trying to get something accomplished for the Asia style tree.  Everyone liked the iris folded ornaments so I have been concentrating on making more of them.  I bought some wonderful origami paper unfortunately it was a bit expensive.  It was tricky but I squeezed out two ornaments with the origami paper, a fan and another kimono.  The iris folding patterns were from the book "Iris Folding, Spiral Folding for Paper Arts" by Design Originals.  This is a great pamphlet style book and comes with patterned paper inside.  I have a couple more of their books and treasure them all.
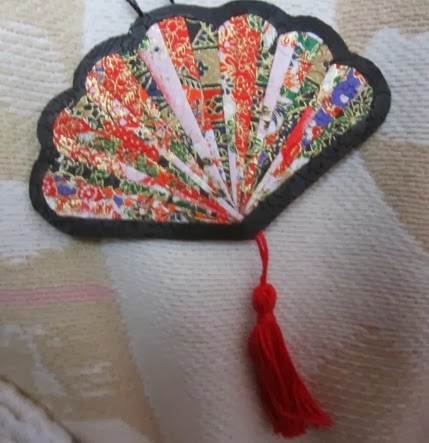
 
Iris folded origami paper fan.
 
Sadly the fan ornament had a flaw in the design.  All the layers of paper end at the same point at the bottom of the fan.  This made the fans extremely bulky.  So I cheated!  I only folded the papers slightly instead of in half, reducing the bulk.  Then once the fan was done I carefully cut away some more of the excess paper at the point.  That was scary, but I didn't hurt the layering.  Even with all of the cheating the fan was still too thick at the point.  So then I had a great bit of inspiration and put it in an embossing folder and ran it through a Cuttlebug!  The embossing enhanced the design greatly and squished it a lot flatter.  It was tricky adjusting plates so that such a fat project would go through and in the end I had to scrim it.  Then I ran the cardboard backing for the fan through the machine.  Next added a tassel and hanging thread and hot glued it all together.  I also ran the kimono ornament through the Cuttlebug to make it look richer with the embossing.
 
 
Iris folded origami kimono.
 
Yesterday I worked on a framed piece inspired by the kimono pattern.  A kind person gave Lee a beautiful 16" x 20" frame.  From the moment I saw the frame I knew that it was going to be part of the Asian style tree.  Along with the tree ornaments we also needed to add gifts and so this would be my gift contribution.  So I enlarged the kimono pattern and then cut it out of a 16" x 20" piece of black mat board.  Then I took several handmade papers and some gift wrap and made a larger version of the kimono.  It isn't finished yet, I am still thinking of changing the image in the center.  The image in the framed kimono is a little too blue.
 
 
Framed iris folded kimono.
 
So far only five ornaments are finished.  My hope is to make more of the teapots today, since I already bought fabric for the project.  Maybe I will be able to make a tutorial on the teapots.  It has been a long time since I did a tutorial.  Only two days to finish up and I still haven't made up a necklace for another tree gift.  Got to get back to work!

Sunday, November 17, 2013

Marie Antoinette Tree Finished

After a year of work the tree was put together and raffled at the Santa Maria Elks club last night.  I apologize that it took me so long to edit the pictures and unfortunately the pictures of the whole tree weren't clear.  But the tree came out beautifully!  The tree was a group effort and it came together creating a magnificent tree.

 
Tree table and bodice.


Vase with tray of fake goodies.
 
 
All I said was, "Let's have cake" or "Let's eat cake" or something like that, and suddenly, everyone got pissy!
 
 
Top of shelves, covered with Marie Antoinette dress.
 
 
Shelf with faux goodies.
 
 
More goodies.
 
 
Even more goodies on shelves.
 
 
Tray with more faux goodies.
 
 
Close-up of goodies.


Table of goodies and perfume bottle.
 
 
Goody table showing jewelry and hair set.
 
 
Ceramic pug dog.
 
 
Cool shoes!
 
 
Marie's head in tree.
 
 
Close-up of Marie's head.


Chandelier tree top.


Tree ornaments.
 
 
Ornaments and gifts.


Wednesday, October 9, 2013

Another Ornament for the Asian Style Tree for Altrusa

 
Three sided paper ornament.


Last evening I made another ornament for the Asian Style Altrusa tree.  First I started by printing out 3 images onto high gloss photo paper.  Then cut six 4 inch circles, using a Fiskar circle template, out of a shimmery silver paper.  The paper was strong and flexible like a thick vellum.  Next I centered the printed images using the 3.5 inch circle template.  Because the pencil marks kept smudging on the image I used the top of a crochet hook to mark the cutting line.  Then with the six silver circles and the images cut out I started to glue.  First I took the images and glued them to three of the silver circle.  Using the plain silver circles I glued half of circle A to circle B, then glued the second half of circle B to circle C.  Next I glued in the center a doubled silver thread to create a hanger and leaving enough thread at the bottom of the ornament to tie a tassel to.  Finish by gluing the leftover half of circle A to the last half of circle C.  Here is the ornament looking through the top.

 
The silver circles glued together form the inside section.  The image circles form the outside.
 

Next using the silver circles with the images I glued them to the silver center at the center edge.  This created the outer part of the ornament.  This left a space behind the image circle.  Finally I made a tassel from the silver thread and added it to the bottom of the ornament.  Here is the finished ornament showing the three sides.  Very simple and lovely.  This would be great for a first Christmas or other family pictures.


Tuesday, October 8, 2013

Altrusa Ornaments Prototypes

The fifth week until the first tree is due has come.  No time to think of new ornaments.  This week will be finishing the prototypes and getting them approved.  In fact we are so tight for time that I started making paper ornaments which takes a lot less time to construct.  Or at least faster to make then embroidered ornaments.  The first paper ornament is a Marie Antoinette cut in two layers so the hat and dress pop out.  This first ornament is backed with gold cardstock and has a tassel hanging from the bottom.

 
Marie paper ornament.
 
The second ornament is Marie again but this time I left her on a gray background and it has a description of the gown.  I really like the simple background.  This ornament also has two layers so the hat and trim on the dress pop out.
 
 
For the Asian style tree I used an iris folding pattern of a kimono.  The background is gold cardstock and I bought handmade red and black papers for the folding inside.  This came out nice but the gold cardstock inside the kimono takes away from the design.  I plan on making another but with a printed gold paper instead.  This also has a tassel on the bottom.
 
 
Iris folded kimono ornament.
 
Yesterday I worked on a prototype of a topiary ornament.  First I took some white cloth and worked pink silk ribbon roses inside a 3 inch circle.  Then I worked detached chain stitch to fill in around the roses.  To finish it I ran a running stitch around the edge of the circle and pulled it tight while stuffing it with fiber fill.  Next I put a dowel into the topiary and secured it with hot glue.  Finally I secured the dowel into an empty half/half container using hot glue and put moss on top of the container.  This didn't come out very well because the fabric circle needed to be larger and the roses smaller.  So on to prototype number five on the topiary tree.  Next time I will try a 4 inch circle and turkey stitch for the greenery.
 
 
Fourth try at a topiary ornament.
 
I will say this, these ornaments will be different from the ornaments at the stores!  Back to the thick of it!