Showing posts with label step by step. Show all posts

Thursday, June 14, 2012

Making a Rug from Sheets

Well the project has decided to be a rug.  It is made from two sheets.  One a dark green cotton and the other a flannel with a rose pattern.  There is a little trouble with the tension and keeping it flat.  When it is finished I will go back with some cotton quilting thread to reinforce it.


Close up of sheet.

As part of organizing the house I was trying to see what I could do with old sheets. Earlier this week I gave up and was going to take the sheets to the Goodwill. Then I remembered the cotton core rugs. The flower sheets were the first set I bought for myself, and I love them. So I wanted to keep them a little longer if I could. They are over 20 years old but still have some life to them. If this rug works out I have a lot more sheets that need to be recycled.


Close up of rug.


A closer look it is really cute!

Some how to pictures. 


How to start


Picture of toothbrush tool.


Start by wrapping the cotton cording with fabric.


Bend the wrapped cording into a rounded shape.


Keep coiling the wrapped cording until there is enough
coiled so that you can start sewing into the previous round.


How to weave the rug.


The 1 inch sheet strip is going under the cotton cording.


The fabric is being wrapped around the cording two or
three times with a little overlap.


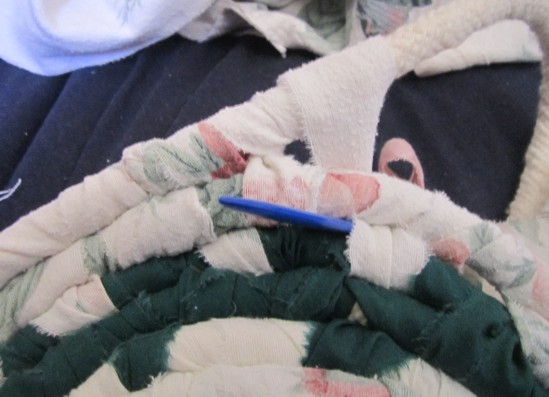
Next the fabric is pulled back to front through a space
on the previous round.  You can see the blue
toothbrush tool.  It makes this step really easy.


Fabric being pulled to the front of the rug.  I am
making the strips the full length of the sheet.


Final step the fabric is on top of the rug.  It now needs
to go under the cording and starts the wrapping again.

I hope that someone is inspired to try this easy rug making technique.  The cording was 29 cents a yard and the tool was $3.00.  All together the project was under $10.00!  Not bad for such a pretty rug!  If you would like more information please leave a comment.


Wednesday, June 13, 2012

Rug or Basket?

Now that I'm finally done with chocolate, I'll share other stuff I've been doing.  I have been working on a bracelet design and learning to use a snowflake frame.  Neither has been working out!  I'm half way through another book tutorial, this one is an accordion style with a secret! 

So I thought I would go in a completely new direction.  I am trying to make a big soft basket or a rug.  Today I bought 20 yards of cotton cording for the base from Beverly's Crafts here in Santa Maria.  They had several sizes but I got the 1 inch diameter cording.  It is very soft so it would probably be better as a rug.  At first I thought of using some cotton yarn for the weaving.  Now I'm thinking of tearing up some fabric that I bought a couple years ago to make rugs with! It was under $3 a yard so that isn't to bad.  There are also a lot of bed linens that need to be recycled.

Right before the wedding I bought a toothbrush rug tool so I may try that method.  There is a nice video on making toothbrush rugs.

 http://www.ragrugcafe.com/toothbrush-rugs-complete-video-instructions-part-1-beginners

Always too many projects!  We will see if I can make rugs this week!

Chocolate Truffles Recipie III

Now that the truffles are shaped and cold it is time to dip them into more chocolate!  What could be better than that!  Dipping the truffles is not that difficult, but tempering the chocolate can be.  Below is a technical description that I wrote several years ago.  This is not the only way to temper chocolate.  There are easier methods.


Tempering is the process that causes chocolate to form crystal giving it a shine and crisp texture. Tempering starts by melting the chocolate to a specific temperature, letting it cool, then heating it again. It takes time and an accurate digital thermometer to temper chocolate. For bittersweet chocolate heat to 118 to 120 degrees. milk chocolate heat to 116 to 118 degrees. When the chocolate comes up to the proper temperature remove the top of the double boiler and let the mixture cool to 80 degrees for both types of chocolate. Stirring will speed up the cool down process. Then replace the pan on top of the double boiler over simmering water and reheat. For bittersweet chocolate bring the mixture up to 88 - 91 degrees. For milk chocolate you want 85 to 87 degrees. During the whole process the chocolate should be watched carefully and stirred often. After the chocolate is at the correct temperature you must keep it within the temperature range while dipping the truffles.


For more technical information see my site www.craftersnotes.com


Working now with an understanding of what tempered chocolate is we can cheat! 


Cheaters Never temper!


If the chocolate you are dipping with is already in temper gently melting it to the proper temperature for that kind of chocolate is all you need to do.  So check your chocolate for these signs of being tempered, crisp when broken, no grey streaks, shiny and not melted.  If any of these signs appear either temper the chocolate or use it to make another batch of truffles centers.
If you decide that you don't want to bother with this you can buy candy melts to dip the truffles in.  There are different qualities of these on the market so go with the best tasting you can find.  These will not leave a crisp chocolate shell when you bite into them but they also won't melt immediately in your hand either.  If you want to learn more techniques see my site or do a search for tempering chocolate.


Once the chocolate is melted you need to keep it with in the temperature range for that chocolate type.  So it is recommended that you have the truffles at room temperature before dipping.  That is the proper way to dip.  I don't do that.  When I dip truffles I drop the frozen centers into the chocolate.  This means that the chocolate can loose its temper and it will need to be warmed up more often.  This is one of the things you just need to practise at and at first a thermometer helps.  As the chocolate cools it will get thicker which is a great clue to reheat it.  Some people use a heating pad under the chocolate to keep the temperature even,  Just be sure to cover the pad so you don't ruin it.  I just take the whole double boiler to my dipping area, then reheat the bottom portion as necessary.


Drop the truffle center into the chocolate then immediately remove it with a candy dipping tool or fork.  Make sure it is completely covered in chocolate and then shake the excess chocolate off.  Gently brush the truffle across the pan lip to get rid of the excess chocolate from the bottom of the truffle.  Then tip the tool or fork so that the dipped truffle rolls off onto wax paper to dry.  If you have a little extra chocolate left on your tool you can add a swirl or repair a damaged truffle.  Sometimes the truffle sticks to the tool, that is because he truffle is still to soft or the chocolate is to hot and melting it.  Try putting the truffles in the freezer for minutes and try dipping them again.  Also check the melted chocolates temperature.  This is just a skill that needs to be learned, but if you do you a wide range of candies can be made!


Good luck!

Tuesday, June 12, 2012

Chocolate Truffles Recipie II

Now that the truffles have set the fun begins! You will need a spoon or a melon baller is better, to scoop out the truffles. Some wax paper or board to work on and lots of cocoa powder to keep the truffles from sticking to you.   I like to use a plate that can go in the freezer and can fit in a sealable plastic bag to put the finished truffles on.  This is just to firm them up, take them off the plate to store.

Now is the time to decide on how to finish the truffles. You can chocolate dip them which will be tomorrows blog. The classic finish is just to roll them in cocoa powder (my favorite).  But you can also just roll them in something. For instance finely chopped nuts, sprinkles or cookie crumbs. I like to put Oreos in a food processor and grind them fine and roll the truffles in it. However the cookie crumbs go stale fast so I only do that right before serving.

If you put the truffle mixture in the refrigerator you will need to let them sit an hour or more to soften. If you don't wait you can really hurt your wrists. If you left them on the counter overnight they should be firm but easy to make rough balls shapes.

Sometimes when you have accidentally stressed the mixture you will see pockets of yellowish butter or even cocoa butter. This is not ruined! 


You can see that the mixture separated slightly.

My first try did this and you can still use it. Just remove the fat pockets as you spoon out the chocolate. The worst that happens is that the chocolate is not evenly set so that there are harder bits like chocolate chips. I remove the larger of these bits while rolling the truffles. The bits just add texture to the truffles. No one has ever complained! But if you feel uncomfortable using the mixture it can be gently remelted, and try again. Or it can be saved in the refrigerator and scooped out and made into the best hot chocolate!

Once the chocolate mixture is firm spread the cocoa powder on the work surface, if you use a sieve it will take less cocoa powder to roll them. Then use a spoon or melon baller to scoop the truffle mixture and place onto the work surface. Be sure everything including your hands has been dipped in the cocoa powder. 


Dropping bits of truffle mixture onto cocoa powered surface.

If you have hot hands this can get tricky. Once you have a lump of truffle mixture spooned out try to form it into a ball. Use your hand, trying to roll with the part just below your fingers. Use light pressure and roll the mixture into a rough ball, by rolling it on the work surface. Usually the first one just melts on your hand, it takes some practise. You may need to wash your hands often during this process, but if the mixture is soft and melting it may just need to firm up more. Being to soft and melting also means fewer truffles!


Rolling a truffle.


Rolling a truffle.

At this point if you are not going to dip the truffles in chocolate you can roll them into nuts and other toppings. If the toppings don't stick warm the truffle in your hand and roll in the topping again. If you are going to eat them soon place them in the refrigerator and take them out one hour before eating. For long term storage, they can keep up to a month if frozen. I freeze them over night and then dip them the next day. Tomorrow I will post on how to dip chocolates. If you want to learn more you can go to my site at


Truffles ready for the freezer.

Monday, June 11, 2012

Chocolate Truffle Recipe

Today is a chocolate kind of day.  I have no idea why but I'm going to start some truffles.  If you have never made your own truffles you are really missing out!  So let's get started.

This is a two day process, you can make them quicker but will get a smaller yield.  First you want to get a pound of the best dark chocolate or bittersweet chocolate that you can find.  From 50 to 70 percent cocoa mass.  If you want to chocolate dip them you will need at least another pound.  You will also need 1/2 cup unsalted butter and 1/2 cup of cream, and the best vanilla.

To start you can either melt the chocolate over a double boiler or the microwave.  Chocolate has two enemies heat and moisture.  So only use a double boiler that is tightly sealed and will not expose the chocolate to steam.  Once the water is simmering in the bottom, place the broken up chocolate in the top of the double boiler and take it off the heat.  You may need to reheat the bottom of the boiler a couple more times before the chocolate is completely melted.  The goal is to melt the chocolate not to get it hot.  Stir after 15 minutes to see how melted the chocolate is.  The smaller the chocolate has been broken the faster it will melt. 

To melt in the microwave can be faster but needs more care.  Use a heat tolerant glass bowl and place the broken up chocolate inside.  Heat the chocolate for very short bursts.  I heat for 30 seconds at a time.  You aren't trying to heat the chocolate as much as heat the bowl.  What I mean is that the warmth from the bowl should do most of the work.  You will need to stir often so as not to burn any of the chocolate and to make sure it is heated evenly.  You are trying to just melt the chocolate not get it very hot.  Warning over heated chocolate will explode in the microwave and make a horrible mess.

Whatever method you use to melt the chocolate once it is close to being melted start the butter and cream in a sauce pan.  This is to get the butter melted and gently scald the cream.
When the cream is scalded and the chocolate melted pour the cream into the chocolate.  Gently stirring and folding them together.  Only stir to the point that the cream mixture is smoothly integrated into the chocolate.  Add as much vanilla as you like,  I use up to two teaspoons this amount differs according to taste and how much vanilla was in the original chocolate bar.


Chocolate and cream mixure being mixed together.
Let the mixture sit to cool.  If it is still hot stir again in 10 to 15 minutes just to help it cool it also helps to keep the mixture from separating.


Finished mixing.

That's it!  Really simple to make.  Once cool allow to sit on the counter overnight to get firm.  Or you can put it in the refrigerator but the colder it is the harder it will be to form into truffles.  So if you do refrigerate the mixture leave it out to warm up before trying to shape them.

Tomorrow will be how to shape and dip truffles!  If you can't wait there are more detailed instruction on my website www.craftersnotes.com.  Just click on the chocolate button.

Thursday, May 31, 2012

Paper Flower Tutorial


Close-up of bouquet.


Finished bouquet.


Enough time has passed that I can now tell how we made 900 paper flowers for my nieces wedding reception. 

My sister's first child gave her mom 3 weeks to plan and execute a wedding for 300 guests.  Her first son gave her 3 hours to get dressed and to the radio station to see him married.  Her second son gave her a 3 year warning.  So it shouldn't come as a surprise that the bride in the above picture gave her mom a 3 month deadline!  Three months and only 200 guests would be easy.  My sister has helped with many weddings and other social events and can do anything!

So they started out with a wedding without flowers.  I don't know exactly why but it does seem sad watching the flowers die afterwards and she wanted an uncommon flower, something like a windflower. Not to mention wedding flowers are expensive!   So a travel on a train theme was decided on, circa 1940s.  Then she saw a bridal bouquet made of  paper flowers.  My sister is a paper artist so this was perfect!  The  bridal bouquet above has over 100 paper flowers and is amazingly beautiful.  Next she wanted all the bridesmaids to carry smaller bouquets in light purple and white.  They started making them when it was decided to not have bridesmaids.  So why not just use them on the tables at the reception.  So suddenly hundreds of flowers needed to be created,  So we had people punching scalloped hearts fom white and light purple paper.  Others making the flowers and my sister doing it all and made the bouquets all by herself.  In the end we had 15 1/2 bouquets for the reception tables.  The flower design was created by my sister Pattie and I have her permission to create the tutorial.  I suggest you visit her blog, it is a real treat! 
http://paperplates-pjbeach.blogspot.com/

Table centerpieces at the wedding.  Travel theme included old suitcases
picture of couple with an old train, paper flower bouquet and
congratulations banners to wave as the couple leaves.

Enough rambling, now for the tutorial.

What you will need for a flower, scalloped hearts of the
same size, a thin stick or dowel and a hot glue gun.


Step 1: Punch or die-cut 10 to 12 scalloped hearts the same size.  You may want to use scrap paper first before cutting a  lot of hearts.  I used the Spellbinder's scalloped heart to cut the petals out because it has 6 heart sizes..  But if you are going to make a lot of flowers Pattie suggest a punch because it is faster.


Step 2:  Next with hot glue adhere the dowel to the side of heart.  Make sure the dowel is below the top of the heart.  As you see in the picture, you can use miscuts for the center.


Step 3: Roll the paper around the dowel and glue the shape closed.


Step 4: Glue the flower to the middle of the second heart. Always make sure that the flower is glued to the next petal slightly above the heart. 


Step 5: Roll one side of the heart loosely around the flower to the center and then the other side around that.  The reason that the flower is glued to the middle of this heart is that it forces a space around the center of the flower.  Glue the petal closed.  At this point you may need to pinch the bottom of the flower and put extra glue on the bottom to hold it in place,


Step 6:  Glue the bottom of the next heart to the flower, seam side edge into the glue.    Make sure the flower is slightly above the top of the heart.  Roll one side of the heart then the other and hot glue in place,  I put a small amount of hot glue near the edge of the heart.  Think of this like adding a tube around the center.  From the top you should see some space but not a lot.  Just like looking into a rose.  Continue telescoping the flower it is important to the look..

Step 7: Keep adding petals by gluing at the bottom of the flower and glueing it closed around the flower center.


Step 8: Eventually you will need to add two petals at a time because the width of the rose.  Just like before centering a new heart over the previous petal edge and glue at the bottom.

Step 9: You can stop at anytime, adding more petals for a larger flower.  By now it should look like a flower.  Be sure to glue the flower edges to stabilize the flower.


Finished flower.

The individual flowers look a bit strange alone.  This is because of the telescoping.  For individual flowers I would not telescope them,

Putting it together.

Pattie glued a styrfoam ball to a candlestick.  Then glued flowers to the ball keeping thr round shape.  The flower dowel needs to be cut off short because long ones will keep other flowers from being set into the styrfoam.  it is a bit tricky, perhaps Pattie will be up to making a tutorial!

I hope this was helpful.  Please let me know if the instruction are clear.  I would love to see what was made with the tutorial.

Enjoy your crafting.

Tuesday, May 29, 2012

Piano Hinge Book 2

Yesterday I made the inner part of the book structure and wove it together using wooden dowels.  Today I will show how to do the covers and finish making the book.

The covers were made using scrapbooking cardstock cut to 9 inches by 11 inches, then folded to 5,5 inches by 9 inches.  Next I used the template to cut the notches into the folded end of the covers.  Using wooden dowels I wove the covers ( front and back) onto the book.

Then I had some fun with Jim Holtz die cut of a dress makers dummy and is alterations embossing set.  The covers I used were turquoise so I made the embelishments red and pink.with a few buttons added on.  I had left my covers open because I thought I might want to hand sew though the cardstock.  I suggest glueing them together when done decorating.


Front cover of book.


Back cover of book.
Now is the time to decide how the book will work.  You can set the dowels into a circle and then put them in a tall bottle cover.  Or a more traditional flat book.  For a flat book align the spine so that the pages and dowels are lined up.  Once you have it aligned use some fiber like twine or thread or even yarn to weave the dowels at the top together.  A simple weave of over under will be fine.  This needs to be tight. 

Weaving the dowels with fiber.


Cut ends of bottom of book.

Next do the same thing to the bottom dowels.  If you are going to cut the dowels even with the bottom of the book, place glue on the dowels to secure the last two or three rows of weaving.  I did this for my book but left the top dowels long as a decorative element.  Also I left the two top ends of weaving long to use as bookmarks.  Don't forget to touch up the cut dowels with paint.  It's done!  The book should be able to place in a bookshelf and be able to lay flat when open.


Finished spine of book.

Monday, May 28, 2012

Piano Hinge Book

Someone on pintrest has been posting instuctions on bookbinding which are really well done. But stupidly I didn't pin them. In any case I felt like making a book today. Bookbinding is one of the artforms that get great pleasure doing. To do traditional bookbinding takes many stages and days to do. Today I wanted to play not make a more traditional book. So I went into the office and found some Astrobright paper, I have a lot stashed because it is over 100 miles to a paperstore. I had just gotten a copy of Cover to Cover by Shereen LaPlantz, which is a fantastic book on bookbinding, So I got the instuctions to make a piano hinge book from it. The book suggests 50 piece of paper folded in half. So I chose 10 pieces of five colors, yellow, pink, red, orange and green.


Astrobright paper


Next I put them together in sets of 5 pieces of folded paper, the sets are known as signatures. The way that a piano hinge binding works is to weave the signatures together with a strong material like wood or metal. Chopsticks or corndog stitcks can make really nice books. I had some 1/8 inch dowels which is easier to use because they are flexible. So to keep with the brightness of the paper, I painted the dowels bright purple!


Painted dowels drying.
Next I created a template for cutting slits in the signatures on the fold. I roughly marked the template in about 1 inch increments. Then cut wedges on two signatues (using the template) and tried to weave them together using a dowel.

Notches cut into signatures.


Signatures being woven together with a purple dowel.


Signature open to the middle page so it is easier to weave the dowel.


The first try I had the notches to shallow. So I decided to cut deeper triangles and it was still hard to weave but I was able to do it. That is important to this kind of binding, it has to be tight to hold together, but not so tight that the dowel breaks or the paper rips. So every time you change materials you have to make a new template. When making your own books I suggest openning the signature to the middle page while weaving it makes it easier fit the dowel in the triangle while weaving. Also the notches don't have to be exact but they do need to be consistant from signature to signature. If you decided to use round dowels, turning them while pushing the dowel helps to slide them though the signatures easier. Also be aware that it is easy to damage the corners of the pages while weaving. Piano hinge books are work but they look great and are fun. After weaving the first two signatures together you then weave the third signature on top of them pulling up the triangles that were not used on signature number 2. You continue adding signatures so that the whole book holds together.


You can see how the purple dowels show up woven though the signatures.


This is as much as I was able to do today because of time, hand strength and I need to paint more dowels. Tomorrow I will post the rest of the project i.e. putting on the covers and decorating the book. Hope everyone has enjoyed a day of crafting.today.

This was not meant to be a tutorial, if you found my instuctions are incoherent here is a tutorial for making piano hinge books.
http://www.making-mini-scrapbooks.com/pianohingebook.html

Friday, April 27, 2012

Wedding wish jars tutorial

For the wedding my niece wanted wish jars, the idea was that everyone would write a wish and place it in a jar hanging from a tree.  We tried ribbons and silk flowers but the jars were cute but not what the bride wanted,  So we tried wire wrapping.  The first one I tried making a canning jar type of wrap but that took to long and was overly complex.  So I went back to try again and this is what we decided on.

Image Nixon Wong Photography

How to wire wrap a jar.


Finished jar.

Step 1: Take a piece of wire, I used 20 gauge Zebra wire.  Start with pliers and bend the wire around one arm of the pliers creaing a loop.  Work off the spool to save wire.


Step 2 : Keep wrapping a spiral with the pliers or change to a wire straighting tool.  The straightening tool won't leave marks on the spiral. Keep wrapping the spiral, until it is one quarter to one third the size of the bottom of the jar.  But make it large enough to hold the jar inside the wire wrapping.


Making the spiral


Finished spiral.

Step 3: Now bend the wire nearly straight up.  Hold the spiral to the bottom of the jar and start bending the wire around the jar.  Keep wrapping until the wire is to the edge of the jar lid.  Wrap the wire half way around the jar edge.  This will give the wrap stability.


Wrapping wire around jar.


Wrap at edge of jar lid.

Step 4: Bend wire at straight up from the jar edge.  Take time now to make sure that the wrapping is tight and that the spiral is supporting the jar bottom.


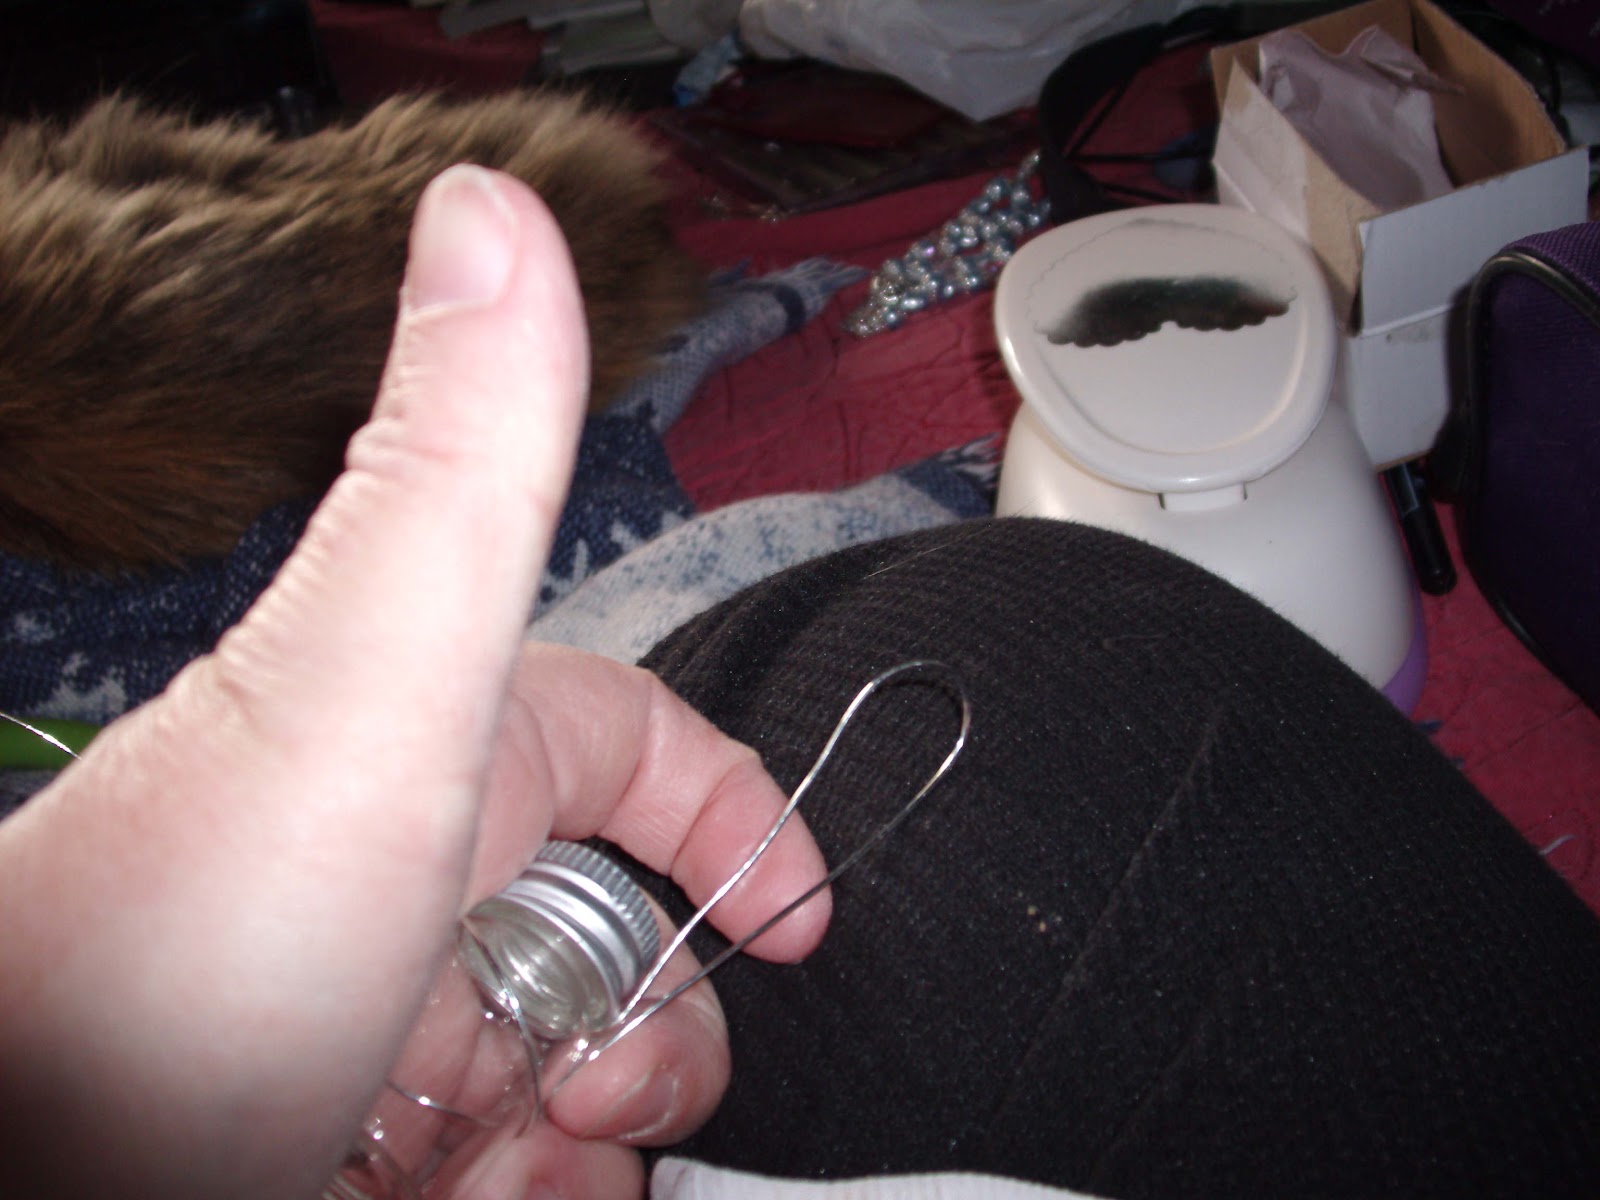
Make hanging loop.

Step 5: Bend wire into loop to hang the bottle from. leave about three inches of wire below the loop. This is for closing the loop with a wrap.  Cut wire.  If you want a charm on the wire wrap add it to the loop.


Cut wire with charm added.

Step 6:  Bend the cut wire end 90 degrees.  Hold the two wires together with pliers and then wrap the cut end around the bottom of the loop wire.  At this point it is easier to wrap without the jar.  Also be careful not to drop any charms while closing the loop.


Starting the wire end wrap.


Finished closure.


Step 7:  Place the jar back ino the wire wrap, it may need to be tightened again.  Hang the bottle on a tree like we did or if you make a small loop it would make a nice pendent.


Wish jars on tree for wedding guests.


If you found this interesting lease leave me some feedback.