Megan the orchid was loosing a flower so I picked it and drew a template from her sacrifice. At first I was going to make a stumpwork pattern but instead decided to start with a needle painting. Maybe this will go into the embroidered quilt. The biggest job is finding the right colors, DMC's colors don't seem to ever have the right shades of purple! The colors I picked out are pretty but not accurate. The truth is that I keep changing the colors and perhaps I need to shop for some more floss!
I have been working on the needle painted yellow poppy. I am still having a hard time with the shadows on the petals. To little and the depth is wrong to much and the petals blend into each other. This is a bit harder on a poppy because the petals don't overlap as much as other flowers. So there is just a small but important amount of shadow to work. Needle painting seems to be a type of embroidery that takes a bit more creative thought and is unique to each needleworker. Makes be long for a painted canvas! Not a lot of decisions to make just a lot of fun stitching!
Yesterday I started several projects. Not exactly a great idea to start more embroideries but sometimes I have to take advantage of being able to iron the fabric. So I started working on a Jacobean style embroidery using the wool and some natural colored linen fabric. The other day I was trying to come up with a Jacobean design when I received yet another book from www.paperbackswap.com. The book was "The Margaret Boyles Book of Needle Art. There are several designs in the book that I really like and it saved me having to make up my own Jacobean designs.

Showing posts with label Projects. Show all posts
Showing posts with label Projects. Show all posts
Thursday, August 8, 2013


Tuesday, August 6, 2013
Found Some Projects Today
Yesterday I was thinking about making another skirt. I found nearly 5 yards of a deep royal blue cotton fabric. The cotton fabric is so lovely definitely Kona. So that got me to thinking about a blue skirt I started a couple years ago. The project had been put aside when I couldn't get the sewing machine to behave. Matching the two fabrics I found that they were the same and I must have bought 9 or more yards. Then I found the pattern and it called for more than 8 yards because it included a matching blouse. So it is a good thing I didn't start another skirt!
The pattern is a full length skirt made in three equal sections which makes it very wide too! Each section has 2 deep darts and then the fabric is sewn together leaving one seam open to put a zipper in. Then the top of the skirt is gathered before adding the waistband. Even with the darts sewn each section is 34 inches making the entire waist 102 inches before gathering. All that fabric at the waist does not sound flattering! But the project should teach me a lot and will take time sewing it by hand.
While searching through projects I found the Herb Robert embroidery! I began to worry that the project had been thrown out because I hadn't seen it for so long. The Herb Robert embroidery is so beautiful I am very glad to have found it. The wire worked petals were in the bag also! Perhaps after the skirt is finished I can get back to doing the stumpwork part of the Herb Robert and finally give it as a gift.
The pattern is a full length skirt made in three equal sections which makes it very wide too! Each section has 2 deep darts and then the fabric is sewn together leaving one seam open to put a zipper in. Then the top of the skirt is gathered before adding the waistband. Even with the darts sewn each section is 34 inches making the entire waist 102 inches before gathering. All that fabric at the waist does not sound flattering! But the project should teach me a lot and will take time sewing it by hand.
While searching through projects I found the Herb Robert embroidery! I began to worry that the project had been thrown out because I hadn't seen it for so long. The Herb Robert embroidery is so beautiful I am very glad to have found it. The wire worked petals were in the bag also! Perhaps after the skirt is finished I can get back to doing the stumpwork part of the Herb Robert and finally give it as a gift.
Friday, July 19, 2013
Thrift Store Finds for Altrusa
Today was a very lucky day for finding pretty things at the thrift store! It was like the stuff was waiting for us! Two weeks ago we found a copy of a 18th century French woodcut of a Ball. The store said they would get it down but still hadn't, they had no ladder. Lee found two in the store and after a bit they finally brought it down. Here are some pictures of it. I didn't want to take the glass off so the pictures aren't great. And it was only $5.00!


18th Century French Ball.
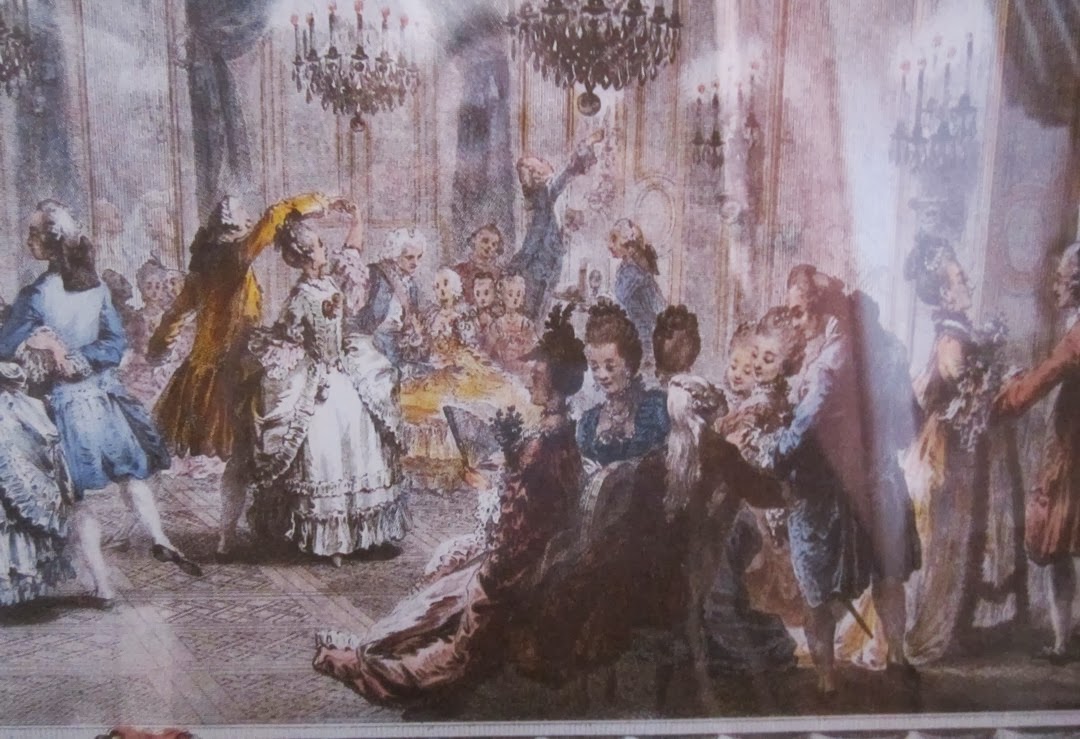
Close up of the party!

Close up of the other side of the party.
The frame was made of a plain thin wood. So we went to another thrift shop and found an ornate frame and it was the right size! The frame cost $7.00!

Here is a close up of the frame, the roses are so lovely!
I also found this lovely old frame. It is the right size for a large hand mirror. Just drop a mirror in and embroider the back!

Lovely old frame.
Then I found this old silver plate coffee carafe. The ornamentation is amazing.

Coffee carafe.

Etching on the silver on the carafe.

Ornamental scroll work.

The carafe in action!
A wonderful day for the Marie Antoinette Tree!
Sunday, June 30, 2013
Marie Antonette Embroidered Picture
Doing two Altrusa trees this year has meant a lot of planning and starting early on the decorations and gifts. So far I have volunteered for several decorations but I am not sure what gifts I could make. The thing I like about our groups tree is that we don't throw money at them. We make almost all of the stuff ourselves. Some members do donate money for the supplies to make things, which is very generous. We also get things from thrift stores and fix up. One gift idea that I've had was a pair of crystal earrings. I bought 2 large pink crystals that will be used to dangle large woven gold drops. The crystals will made into cabochons sew in with gold or pearl beads, haven't made my mind up yet! That is as far as I've gotten making gifts!
Last night I was looking at a friends pintrest page, http://pinterest.com/lindageorgeadis/marie-antoinette/ , and came across a lovely picture of Marie Antoinette and decided to embroider the picture as a gift. I could have turned the image into a cross-stitch or needlepoint. But instead I printed the image on cotton canvas and started embroidering sections to bring out the image.


Last night I was looking at a friends pintrest page, http://pinterest.com/lindageorgeadis/marie-antoinette/ , and came across a lovely picture of Marie Antoinette and decided to embroider the picture as a gift. I could have turned the image into a cross-stitch or needlepoint. But instead I printed the image on cotton canvas and started embroidering sections to bring out the image.

Original printed image of Marie Antoinette onto cotton canvas.
When starting this kind of project deciding what to do first can be daunting. So I took one thread of gray DMC and started embroidering straight stitches to add detail to the feathers in her hat. This gave me the courage to keep working. Besides all of the thread and color challenges there is also the challenge of getting the needle through the fabric. The fabric is a commercially processed sheet that can go through a printer. The fabric is very thick and besides bending several needles I also bruised my fingers when the eye end went into my fingers because the point end would not go through the fabric.

Feather enhanced by straight stitches in grey DMC thread
and variegated silk ribbon added to the hair.
This style of embroidery is completely different from the more standard embroidery forms. Unlike embroidery patterns whether to leave something plain or stitching to enhance a section is entirely up to the embroiderer. The most helpful thing is to have a wide variety of embroidery supplies. In this piece I have used silk sewing threads and ribbon, DMC floss, silver passing, crewel and needlepoint fibers. In the above picture the feathers are enhanced by straight stitches in grey DMC thread
and variegated silk ribbon added to the hair. On the right hand side of her neck bullion knots in dark gray DMC were added. The darker shaded hair and smaller stitches make her hair recede into the background. The color of gray was similar to the artists choice of color.
Curls added to the left neck area using crewel acrylic yarn in pale gray
and seed pearls added to form the necklace.
After enhancing the feathers I had thought to leave the hair simple with a few silver stitches. But the curls were so tempting! So I used a white acrylic crewel yarn and a silver crewel yarn and formed them into loops. Then the loops were tacked down on top of the hair.
How to Make the Loops.
The loops were very easy to make!
Step 1: Thread a needle with a strong thread matching the color of the curls, I used silk sewing thread. Hold the thread along a dowel and wrap the hair fiber around the dowel and thread.

Wrapping the hair fiber around a dowel and encasing a sewing thread.
Step 2:
Once the loops are as long as you want for one area, sew through the hair fiber with the encased sewing thread. Make sure to pierce through the actual hair fiber as you sew. Keep sewing through until all the loops are sewn loosely together.

Sewing through the hair fiber.
Step 3:
Sew the fibers through again going in the opposite direction. Tie a small knot at the end of the loop with the sewing thread. Be careful not to pull to tight.

Sew back through the hair fibers, do not tighten to much. The loops should be sewn close together.
Step 4:
Slip the hair fiber loops off the skewer and sew in place using the same sewing thread.

Finished hair loops ready to be sewn into place.

Loops starting to form hair on left side of head.

Bullion knots form tighter curls on right side of head.
Hair added to left hand side of head is made with darker variegated crewel fibers and is formed by making bullion knots. This forms tighter curls which gives the impression that right side of her face is turned away slightly. This is a simple trick to form depth to the picture.

Silver passing is used to give detail to the lace edge.
The last thing that I did last night was to start enhancing the lace on her dress with silver passing thread. This was a bit tricky because after so much work I was afraid that the silver thread wouldn't work and I would have ruined the embroidery. But it came out fine! I used short lengths of silver thread and straight stitches. I worked the silver following the white edge in the lace.

View of dress after silver passing was added to the lace.
Some of the bullions knots on her right side are a bit dark and I may do them over again. The bouquet in her hand has stems and leaves but I still need to figure out how to make the rose. The next big step is embroidering the background. The trick is to make the background interesting and at the same time not so detailed that it is to busy. Now to try and not destroy the picture today by doing something stupid!
Sunday, June 23, 2013
Wedding Garland for the Bride
The last few days I have been working on a design for a Bride's hair piece. She put some pictures on her Facebook page. The flowers are to small for me to make them from ribbon. So I took apart a tiny flower arrangement I made a long time ago and cut some suckers from the olive tree. The suckers were very easy to make into a garland. It came out cute but to bulky. So now I know that I will need really tiny flowers. Once I have the garland finished I think I will try making a basket with the surplus of olive tree suckers.


The quilt idea is coming along. I started lesson 10 the wild pansy and it is coming along slowly. I also added the large round petaled flower yoyo and a small butterfly yoyo to the quilt idea.


The butterfly yoyo is supposed to have rounded upper wings. I kept the upper wings loose and then closed them leaving them pointed. It came out cute! Lots of stuff to work on and the summer is going by fast.

Bridal garland.

Close up.
The quilt idea is coming along. I started lesson 10 the wild pansy and it is coming along slowly. I also added the large round petaled flower yoyo and a small butterfly yoyo to the quilt idea.

Flower shaped yoyo.

Flower shaped yoyo.

Butterfly shaped yoyo.
The butterfly yoyo is supposed to have rounded upper wings. I kept the upper wings loose and then closed them leaving them pointed. It came out cute! Lots of stuff to work on and the summer is going by fast.
Friday, June 21, 2013
I Like My Coffee and Cotton Kona!
The other day I bought some white Kona cotton to finally start on an embroidered quilt. The embroidered designs will be from Trish Burr's book "Needle Painting Embroidery". No more wasting the embroidered lesson or turning them into small projects. The cotton is a medium weight and will take many launderings. Lee preshrunk the fabric for me and I have copied lesson 10 wild pansy onto a 10 inch square. The idea was to make embroidered centers with smaller squares surrounding them. The problem was that the embroidered designs are very diverse in colors. So how would I find colors for the smaller patchwork squares and have the design look balanced? I was working on a square when I had what I hope will be a really great idea. I was feeling guilty because I hadn't finished the yoyo quilt and here I was starting a more traditional patchwork quilt. So I decided to put them together. A 6 inch embroidered square padded and with a simple quilting pattern surrounded by purple yoyos! Here are some of the layout pictures for the quilt.


Yoyo quilt with 6 inch embroidered centers. This pattern is
Wild Pansy from Needle Painting Embroidery.
Wild Pansy from Needle Painting Embroidery.

Test layout.
There is still a problem with color to work on. The purple yoyos are great but will they look right surrounding a peach colored rose? So maybe just embroidering purple flowers would look better. Another idea would be to make yoyos that match the embroidery colors and do a kind of staggered rainbow. Whatever colors I decide on I do want to work some green into the yoyos area. I was thinking of adding green leaves by using the pointed petal tool by Clover. Just a little reshaping should make it look like a leaf. I am getting very excited about this quilt. My estimates are 20 embroidered blocks and 600 yoyos. Lots of fun or work which ever way you look at it.
This morning I planted some interesting plants we found at KMart. Orange mint, red geranium and a pink brandwine tomato plant. We also got a bee balm, greek oregano and fern leaf lavender but I haven't found the right place to put them yet. The bee balm is a Monarda which is very invasive so it may go into a large pot or planted on the edge of the yard. The flowers attract butterflies and bees, we have very few of these visiting so hopefully we will see a lot more.

Fern leaf lavender. It has very tiny flowers.

Greek oregano and bee balm.

The clematis is finally blooming. So very pretty and longer blooming then I hoped for.

Another clematis flower.

Fuchsia in the shade garden in front.
Friday, January 1, 2010
A new year and the last one of the decade. I thought I would try and keep a journal, inspired by my sister Patty who is blogging a year of crafting. My ability to craft lately has been difficult and I thought why not share crafting ideas with others who can craft. Maybe someone will find inspiration to make something wonderful!
January 2, I met with friends to craft and talk and laugh. We have a little crafting group called The Santa Maria Valley Crafters and we meet every Saturday to enjoy each others company and of course craft. On Friday evenings we meet to do embroidery.
I worked on a accordian fold journal. The theme is going to be Victorian roses. For the covers I used the flat 6 x 8 painting canvas. It makes a nice heavy cover which is important for this kind of book. I love that I don't have to cut bookboard! I covered the canvas with a piece of handmade paper I bought in a deep red. The rest of the time I spent cutting a rose from a print by Pierre Joseph Redoubte. A lot of intricate cutting that just takes time. While at Beverly's I found some card stock, ink pad and rub on roses that matched the prints colors perfectly! Unfortunately the paper I chose did not match so I have to rethink that part. Perhaps an offwhite paper and then use the ink pad around the edges to soften and blend, then rub on the roses randomly. We will see how it comes out.
This week I worked on cutting out fleece and felt hearts with a Cuttlebug using a diecut. Also tried embossing the hearts but they would not keep the impression. Using simple stitches like buttonhole and straight stitch I layered the hearts and even stuffed the centers. The project was to be several hearts sewn together and then attached to a pinback. I don't know if it will be a class or not at Beverly's but I hope so.
Very little got accomplished this week, I go to the doctors again soon and hopefully they will get me up and doing things again soon. In the mean time I keep working on small projects so it feels like I'm accomplishing something. Next week back to working on the journals so they can be Valentines gifts.
January 2, I met with friends to craft and talk and laugh. We have a little crafting group called The Santa Maria Valley Crafters and we meet every Saturday to enjoy each others company and of course craft. On Friday evenings we meet to do embroidery.
I worked on a accordian fold journal. The theme is going to be Victorian roses. For the covers I used the flat 6 x 8 painting canvas. It makes a nice heavy cover which is important for this kind of book. I love that I don't have to cut bookboard! I covered the canvas with a piece of handmade paper I bought in a deep red. The rest of the time I spent cutting a rose from a print by Pierre Joseph Redoubte. A lot of intricate cutting that just takes time. While at Beverly's I found some card stock, ink pad and rub on roses that matched the prints colors perfectly! Unfortunately the paper I chose did not match so I have to rethink that part. Perhaps an offwhite paper and then use the ink pad around the edges to soften and blend, then rub on the roses randomly. We will see how it comes out.
This week I worked on cutting out fleece and felt hearts with a Cuttlebug using a diecut. Also tried embossing the hearts but they would not keep the impression. Using simple stitches like buttonhole and straight stitch I layered the hearts and even stuffed the centers. The project was to be several hearts sewn together and then attached to a pinback. I don't know if it will be a class or not at Beverly's but I hope so.
Very little got accomplished this week, I go to the doctors again soon and hopefully they will get me up and doing things again soon. In the mean time I keep working on small projects so it feels like I'm accomplishing something. Next week back to working on the journals so they can be Valentines gifts.
Thursday, April 10, 2008
A day off
I've been having a wonderful day off from work playing in the garden and planting. Today I planted astillbe, bleeding hearts, cala lilies and hanging pots of herbs. Last year I hung several pots of herbs under the almond trees in the back yard and they were incredibly beautiful and tasty.
The backyard is full of fruiting trees, we have three apples, peach, nectarine, lime, cherry, two almonds and an apricot. In the front is a huge olive, guava and pecan. This spring has been beautiful with all the blossoms. A pair of birds having nested in the olive tree and chipped at me the whole time I was planting in front. The olive tree has created an opportunity to have a shade garden. I have planted ferns, maidenhair and china doll, The china doll is huge! Also there are several orchid plants, cymbidiums, Phalaenopsis, Cattleya and Laelia. They love this area of california and can live outdoors with protection. Only the cymidiums are blooming right now and they are beautiful shade of pink. I smile everytime I see them.
As usual I have to many crafting projects to count. Currently I'm working on a ribbon embroidery project. It will be a scrapbook cover for her forthcoming baby so it has to be perfect. I've been practising my stitches because it has to be perfect! I've also been decorating a silk ribbon box. It is traditional to have a beautiful box for storing silk ribbons and supplies. It is a paper-mache hatbox I got at Beverly's Craft store. I painted it turquoise and then sponged it with silver ink. Today I printed out scans of japanese prints to decorate the sides of the box. I think it will be pretty. The original prints were purchased in Japan when my SO's father lived there before WWII. They are so lovely and this is a way they can be enjoyed and the originals safe.
Tonight I am going to read a book from the library "Romantic Silk Ribbon Keepsakes" by Mary Jo Hiney. It has some flower techniques I haven't seen in other books and I'm excited to start reading it. Tomorrow I start seriously stitching the baby album cover.
The backyard is full of fruiting trees, we have three apples, peach, nectarine, lime, cherry, two almonds and an apricot. In the front is a huge olive, guava and pecan. This spring has been beautiful with all the blossoms. A pair of birds having nested in the olive tree and chipped at me the whole time I was planting in front. The olive tree has created an opportunity to have a shade garden. I have planted ferns, maidenhair and china doll, The china doll is huge! Also there are several orchid plants, cymbidiums, Phalaenopsis, Cattleya and Laelia. They love this area of california and can live outdoors with protection. Only the cymidiums are blooming right now and they are beautiful shade of pink. I smile everytime I see them.
As usual I have to many crafting projects to count. Currently I'm working on a ribbon embroidery project. It will be a scrapbook cover for her forthcoming baby so it has to be perfect. I've been practising my stitches because it has to be perfect! I've also been decorating a silk ribbon box. It is traditional to have a beautiful box for storing silk ribbons and supplies. It is a paper-mache hatbox I got at Beverly's Craft store. I painted it turquoise and then sponged it with silver ink. Today I printed out scans of japanese prints to decorate the sides of the box. I think it will be pretty. The original prints were purchased in Japan when my SO's father lived there before WWII. They are so lovely and this is a way they can be enjoyed and the originals safe.
Tonight I am going to read a book from the library "Romantic Silk Ribbon Keepsakes" by Mary Jo Hiney. It has some flower techniques I haven't seen in other books and I'm excited to start reading it. Tomorrow I start seriously stitching the baby album cover.
Subscribe to:
Posts (Atom)