Today I was waiting for the UPS driver to bring the wonderful paper cutting books that I ordered. Last year I was very naughty and swapped a lot of books through www.paperbackswap.com , the idea was to find good homes for my crafting books. Unfortunately I asked for more books then I traded away! So now I have more than 20 books more then traded. Still it could be worse, though I now have over 100 books on embroidery and lace making alone.
The book "Creative Paper Cutting, Fifteen Paper Sculptures to Inspire and Delight" is a lovely book. The projects are quite different from the Scherenschnitte paper cutting. Instead
Creative Paper Cutting" gives a variety of sculpted paper projects. Having read the book using the Amazon "Look Inside" feature, I immediately went to the projects. But instead of starting on the first and easiest project I jumped to project 10. The 10th project is a sculpture of a beetle and very detailed. Instead of laying the pattern on cardboard and cutting the pieces out I just printed the images directly by copying onto the card stock. This didn't work because the card stock was to soft to emboss and it was hard to cut all the printed lines so that they didn't show. The project also called for white tissue paper which I do not have. It was a sad looking beetle especially since I lost one of it's wings! Not a very promising start! Next time I will take advice from the book on cutting and embossing.
The last few days all the projects I have tried have not come out well. This last weekend I worked on learning the flat 10 strand Kumihimo braid worked on the square foam board. The practice strand out well only a few wobbles. Then I cut 10 pieces of size 10 crochet cotton and strung each thread with 50 size 8 seed beads. The strand started well but when I started adding the beads it failed. From what I can see the project needed a thicker thread or smaller beads. The project just couldn't keep the beads in place. Also the glass beads wore the cotton thread badly. Lesson learned! Still I hope to make a necklace using the Kumihimo technique. Tomorrow I hope to make the hummingbird project, it was this project that inspired me to buy the book.

Showing posts with label necklace. Show all posts
Showing posts with label necklace. Show all posts
Tuesday, January 7, 2014


Wednesday, June 6, 2012
Wedding Jewelry Classic Pearls
Today I did a a simple necklace but very beautiful. My niece liked the asymmetrical look and this is what I made for the brides sister to wear to the wedding. The pearls are cream colored crystal pearls and the crystal has a checkerboard pattern of facets. Crystal pearls are harder to damage than glass pearls, they cost a whole lot more too. But they are definitely worth the cost because they are so lovely. I see a lot more pearl necklaces in my future because There were a lot off leftover from the wedding.


Finished necklace.

Close up of crystal.
Sunday, June 3, 2012
Day 15
I have managed to make something every day for two weeks now. Challenging myself to be creative every day is a lot harder then I thought. So is writing up what I've done or at least trying to make it coherent is! I really appreciate people who have been encouraging me and sending me their comments.
So for day 15 I created a 30 inch necklace. I used red agate, Italian marble and gold glass pearls. The marble and red agate strands didn't look good together. But something told me the colors would mix beautifully. What it needed was lots of gold and space. So I separated each bead with a gold pearl. Also I made the wire wraps a bit bigger. It came out quite lovely. They remind me of autumn grapes.


So for day 15 I created a 30 inch necklace. I used red agate, Italian marble and gold glass pearls. The marble and red agate strands didn't look good together. But something told me the colors would mix beautifully. What it needed was lots of gold and space. So I separated each bead with a gold pearl. Also I made the wire wraps a bit bigger. It came out quite lovely. They remind me of autumn grapes.

Doubled Necklace.

Close-up.
Thursday, May 24, 2012
One of those days!
Please forgive my ramblings today, not enough oxygen to the brain and I can barely see the computer screen. After posting yesterday I started looking around for my next project to post. This Saturday there is going to be a bunch of us tatting at the Santa Maria Beverly's Craftstore. So I thought it would be great if I got out the doily I was making and finish it for Saturday. Well I gave up because I couldn't find it anywhere. So then I decided to embroider some opera length black gloves with some silk ribbon roses and some stumpwork leaves. But I couldn't find any of my huge stash of silk ribbons! So frustrated I made another necklace. I started with silver findings and cream crystal pearls and a large diamond shaped metal piece as the main focus. What I ended up with was a necklace with gold findings 3mm black and red crystals and a black crystal donut!


I liked how the red and black crystals showed up between the pearls but I don't like the donut. So the project needs some rethinking when my brain starts working again. Later on in the evening I was looking up an obscure type of embroidery and came up with this link to a beautiful piece of wirework jewelry http://www.flickr.com/photos/gypsymoonartstudio/4853400500/in/faves-ederajewelry/
Even though it was late I got out some 16 gauge copper wire and started to make my own version.

It is not nearly as nice as the above link, but to my credit it is handworked. I don't use a wire tool like a Whirly gig. But after looking at the first piece I am inspired to get a wire wrapping tool and creating my own wirework designs. My hands are still screaming at me!
While looking for some yarn I did find the tatted doily. Perhaps I will wok on that today!
Wednesday, May 23, 2012
Marcasite look necklace
Marcascite is very lovely but very expensive. So I purchased these links and the set crystals on them to simulate marcacite. The necklace came out lovely it was a bit of work getting the beading wire spaced enough to use crimp covers. It took several tries but it is finally done except I ran out of crystals and need to get 10 to finish. Now to think of something to make tomorrow!


Marcacite look necklace.

Close-up of links.
Monday, May 21, 2012
Another Day Another Project

I've taken on a personal challenge to make something everyday! A difficult endeavor at the best of times. So far I've done well on the challenge. Today I'm posting pictures of a green crystal necklace with copper beads. The chain was already a necklace. I just cut the chain and wired in the beads using 20 gauge copper. The bottom piece is 16 gauge copper wire that I strung with crystal and copper beads and copper bead caps. Then I wire wrapped the ends onto the chain. Then curved the wire to round the bottom. The 16 gauge keeps the shape and makes it rather fun. The necklace is really beautiful.

Sunday, May 20, 2012
Small Beaded Purse
Small Beaded Purse

The small purse fits easily in my hand
A while ago I was challenged by the local craft store to make something from a yarn called Spangle made by Premier Yarns. At first I thought of couching it onto a scarf, but couldn't think of a design. So while looking through my latest aquisition of beads I found that the yarn perfectly matched the turquoise crystal beads. So I started crocheting two round circles to make into a purse. The beads I used were size 6 roundells. It took almost 300 beads, mostly because I used double crochet stitches adding two beads to each stitch. All I was trying for was two beaded flat circles. So after several tries I ended up with this pattern. String beads on yarn or thread.
When crocheting beads like this they appear on the backside of the work, this is normal. I used a G hook beause the Spangle yarn is thick like a size 3 thread. Use a thread and hook that will support your bead choice.
Round 1: Chain 6 and join with a slip stitch to form a ring.
Round 2: Chain 1, bring up a bead. chain 1, bring up a bead, chain 1 (This will make the first stitch a chain 3 with two beads. Make a beaded double crochet into the ring 11 times. Connect with slip stitch at begininng of row. (Beaded double crochet: Wrap twice around hook, place hook in ring or stitch, yarn over and pulled loop up, [three loop on hook] push bead up to work, yarn over and bring yarn through two loops, push another bead up and finish double crochet by yarning over and passing yarn through last two loops.) (12 double crochets)
Round 3: Chain 3 as before adding two beads. Two double crochets in each double crochet in round 2. Slip stitch into chain stitch at beginning of round 2. (24 double crochets)
Round 4: Again start with chain 3 adding two beads. Then 3 double crochets in each stitch. Slip stitch into beginning chain. (72 double crochets) The purse I made only had two double crochets in each stitch because I ran out of beads!
Next I took and secured the ends and then with the right sides together sewed through the two circles using wildfire thread 12 lbs. I left half the circle open and tied off the ends. Turning the circle right side out. Next I placed the purse clasp over the open edge and sewed remaining edge to the holes in the clasp. I also added two buttons to hide the original chain 6 loop. I wanted to use a silver chain for the necklace but I didn't have one strong enough for the weight of the purse. So I made a beaded chain using random beads the same color of the purse but with different shapes.
I learned a great deal from this project. First that beads are really heavy! The weight pulled the circles into an oblong. Next time I will try this with size 6 or 8 seed beads. Also I got the purse a little off center when I was sewing it together. I would also add another round to the circles because only a small lipstick or rolled up money will fit inside.
Thanks in advance for any suggestions, if you try this I would love to see pictures!

Wednesday, May 9, 2012
A Turquoise Day
Today I wanted to play with some turquoise beads I had purchased a couple months ago. It isn't a color I work with often and it has been a challenge. So I got out some brass wire that was gold colored, and some bicones and squares in turquoise and black. It is fun to make larger beads by putting several together on wire and then making wre loops at each end. The necklace is made of 66 beads in groups of three. It is long enough to put over my head so I don't have to mess with a clasp! Here are some pictures.


Necklace doubled

Necklace with some of the beads I have.

Close up of beads.
Thursday, August 18, 2011
Some more jewelry I've been working on!
This is jewelry I've been working on in the last month. This first piece is very different from what I usually make. Sometimes the project just has a life of it's own and lets the crafter know what it will be. I've learned over the years that trying to force a project to do what it doesn't want is why some art never looks right. This was made with copper chains, beads and end caps along with fire agates. Fire agates are agates that are dyed a deep orangish color and then fired to create white web like cracks in the stones. Very pretty!
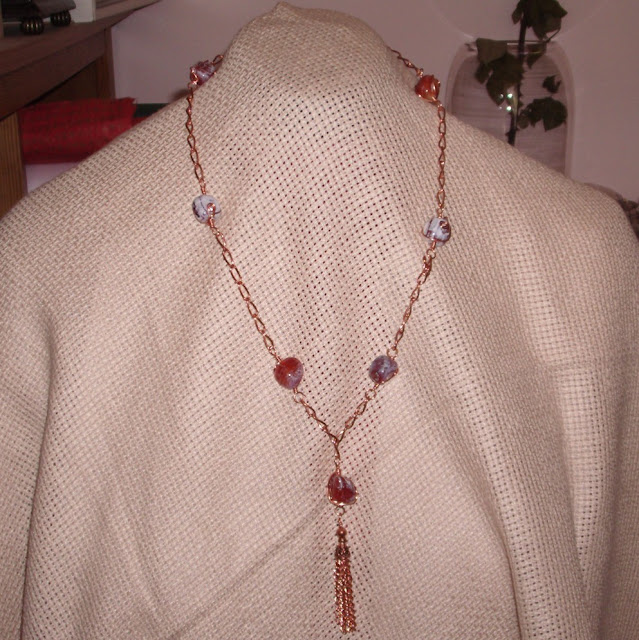
The necklace is hanging on my dress maker model

Here is a close up of the drop and tassel


This is a closeup of the clasp I made. I wanted it to be large and strong looking like the necklace itself. The necklace can be put over the head without using the clasp, many people tell me that they like not having to us a clasp.


Here is a close up of the drop and tassel

This is a closeup of one of the fire agates, you can see some
of the wirework on the bead

These next pictures are my attempts to do chain mail and is why my hand has been hurting! I wrapped the wire around knitting needle and the cut them with handheld wire cutters. Slowly I am getting better at this and work hardening the jump rings. This does take quite a bit of hand strength so I can only work for a few minutes at a time on these.

This is an example of byzantine chain. The reason it looks so open is I do not have the size of the jump rings small enough for the wire gauge. It still looks nice and it is easier to learn the pattern.

Here is a plain double link chain, it does have a nice clasp that I made.

Closeup of clasp

I don't remember what this chain is called but it is really lovely.

Here is the same chain but from a different angle. The chain forms links into a square pattern.
Subscribe to:
Posts (Atom)